MacBook Pro is the flagship product of Apple, and it has launched two new MacBook Pro this year. The MacBook is 14 inches and 16 inches model. It offers these models with two choices of powerful processors. They are M1 Pro and M1 Max with enormous memory bandwidth. It uses the Liquid Retina XDR display with adaptive fresh rates. The MacBook Pro has been designed to place the camera within the screen bezel. It feels like a notch in the MacBook screen. It could hide the menu bar or title bar of certain apps. People have raised concerns over the notch hiding the app visibility. Finally, Apple created a solution to mask the notch in MacBook Pro. In the below guide, we will learn how to hide Notch in MacBook Pro.
How to Hide Notch in MacBook Pro
Apple has provided an option to rectify this issue, and you can find them in the Get Info. It reduces the screen size to remove the camera notch, and you can able to view the app as it was before.
(1). Launch the MacBook Pro and go to the Dock.
(2). Click the Finder icon and browse for the app.
Related: How to Use Time Machine on Mac
(3). Select the Desired App and right-click on the app.
(4). Choose the Get Info in the menu.
(5). Click the Scale to fit below built-in Camera check box.
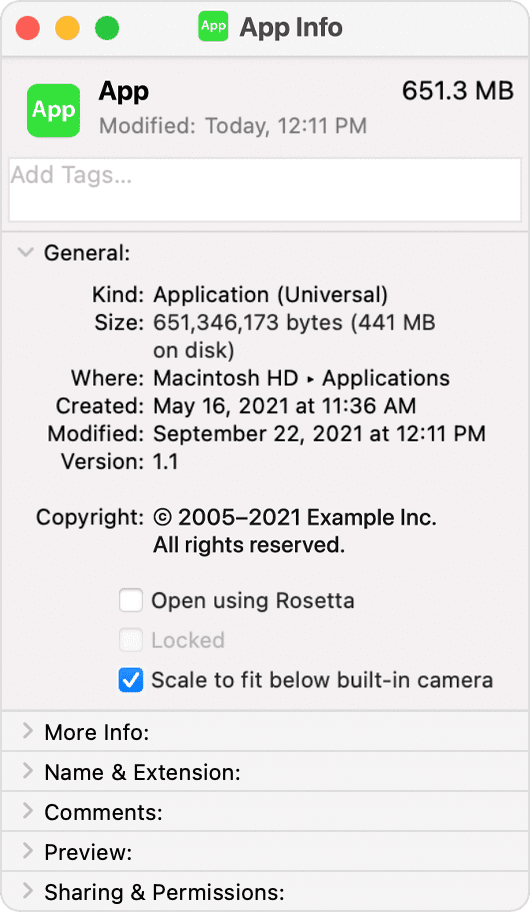
Now, you can launch the required app and see the app appears below the camera. You can view the complete menu bar. It can be resized to the original size by unselecting the scale to fit below the built-in camera.
Related: How to enable Night Shift on Mac
There is also another option to resize the display screen, and it is using third-party apps. These apps are available for free download, and you can select the hide notch option to hide the camera housing. Apple has announced that the app developers will modify their app screen, and they will come into action in the upcoming months.
In case of any queries with the above steps, then please mention them in the comments section. Follow Techowns’ Facebook and Twitter pages to get updates on our upcoming articles.