iPad is no new exception when it comes to setting up parental controls. Like any other devices, there are lots of us who don’t want others to access the iPad features. You may think it as a childproof or adult supervision. Whether you are sharing your iPad with your kids or don’t want others to access your device, it is quite important to ensure your device is secured or not. Hence, setting up parental controlling is an essential thing to safeguard your device and data. Parental controlling on the iPad is all about setting up four-digit passcode. This, in turn, will let you decide what your kids can access and whatnot. iPad supports personalized parental controlling and you can choose to enable or disable different features. The article will help you on how to put Parental Controls on the iPad in brief.
Contents
How to Put Parental Controls on the iPad?
Setting up the parental controls on the iPad is easy and is important for the security aspect.
How to Put Parental Controls on iPad with iOS 12 and above?
(1) On your iPad, launch Settings app.
(2) Select Screen Time from the list of options.
(3) On the next screen, click Turn On Screen Time.
(4) Select Continue when prompted.
(5) Choose This is My Device or This is My Child’s Device option.
Note: Choose the Use Screen Time Passcode to create a passcode is you are a parent or guardian of your kid’s device. Then enter a Parent Passcode and re-enter it again to confirm.
There are lots of parental control settings options listed under Screen Time on iPad. Based on the option you choose, you should either toggle the switch or choose Allow or Don’t Allow changes option.
The possible parental control options include,
- Set content limitations with Content & Privacy Restrictions.
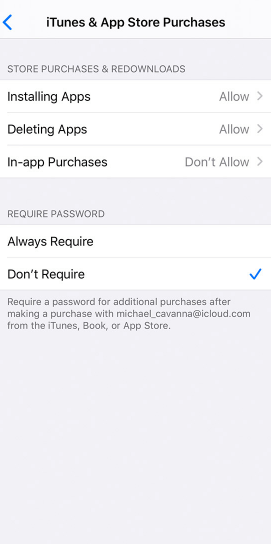
- Limit others making the purchase on iTunes by selecting iTunes & App Store Purchases.
- Choose Content Restrictions option to restrict the type of media others can play on iPad.

How to Put Parental Controls on iPad with iOS 11 & Below?
Follow the procedure to set up parental control on iPad with iOS 11 and below.
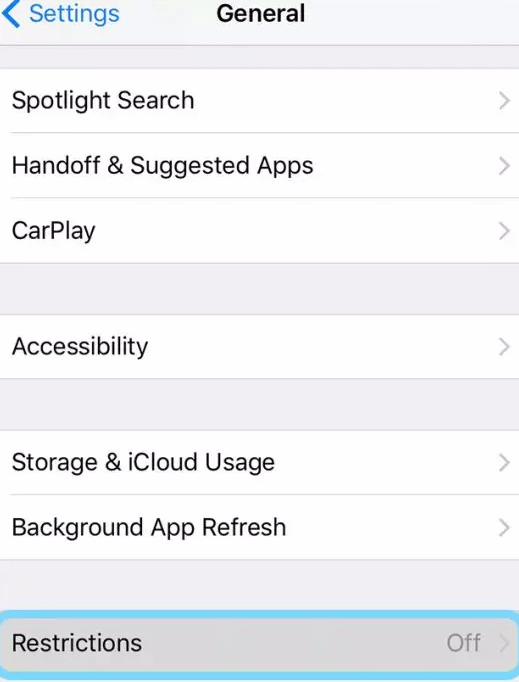
(1) Go to Settings on your iPad at first.
(2) Select the General option.
(3) Choose Restrictions.
(4) Tap and select Enable Restrictions option.
(5) Enter the 4-digit passcode on the next screen.
(6) Now, click on the toggle next to the parental control options to restrict others from accessing it.
(7) When prompted, enter the passcode to confirm restricting.
The available options that supports the parental restriction on iOS 11 and below includes,
- Safari
- Camera
- FaceTune
- iTunes Store
- Installing Apps
- Siri
- In-App Purchases
- AirDrop and more.
You can choose between Allow and Disallow option for any of the features.
Check out the list of Best Parental Control Apps for iPhone here.
Note: There are lots of third-party parental control apps for iPad available. You can even choose any of them to limit the screen for your kids or any other unauthorized users.
That’s a simple task to restrict or provide parental control on the iPad. Do you want to know more about setting up parental control for iPad? Then ask us comments.
Visit us on Facebook and Twitter page to know more about the interesting tech-related tips and tricks.