Screenshots are very helpful in various ways. With the help of screenshots, you can demonstrate a process, explain the issue, report an error message, note-down important things, and more. When it comes to Windows laptops & computers, there are plenty of ways to take a screenshot. You can use the keyboard shortcut or built-in Snipping tool to capture the entire screen or required portion of Windows with ease.
Apart from that, you can install various third-party tools to capture and enhance the screenshots with advanced editing tools. It includes both free and premium tools.
Contents
- How to Take Screenshots on Windows PC Using Keyboard Shortcut
- Method 1 – Using Print Screen Key
- Method 2 – Using Alt + Print Screen Keys
- Method 3 – Using Windows + Print Screen Keys
- How to Take Screenshots on Windows 7, 8.1, 10 & 11 Using Snipping Tool
- How to Take a Screenshot on Windows PC or Laptop Using Game Bar
- 5 Best Free Tools to Take Screenshots on Windows
- ShareX
- How to Use ShareX on Windows:
- Lightshot
- How to Use Lightshot on Windows:
- Greenshot
- How to Use Greenshot on Windows:
- Duckshot
- How to Use Duckshot on Windows:
- PicPick
- How to Use PicPick on Windows:
- How to Take Screenshots on Microsoft Surface
- Frequently Asked Questions
How to Take Screenshots on Windows PC Using Keyboard Shortcut
Keyboard shortcuts are the easiest way to capture your screen in all Windows versions. It includes Windows 7, Windows 8.1, Windows 10, and Windows 11.
Method 1 – Using Print Screen Key
Press the Print Screen key on your keyboard to screenshot the entire screen. On some keyboards, you need to press the Fn key along with Print Screen to take a screenshot.
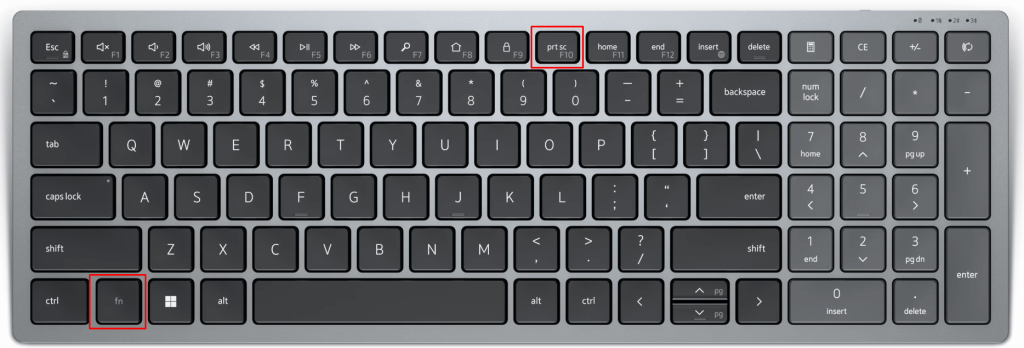
By default, the screenshot will be stored on the clipboard.
Launch the Paint app and press the CTRL + V keys to paste the image. Now, customize the image with the various editing tools available on the paint and save it to the desired location.
Method 2 – Using Alt + Print Screen Keys
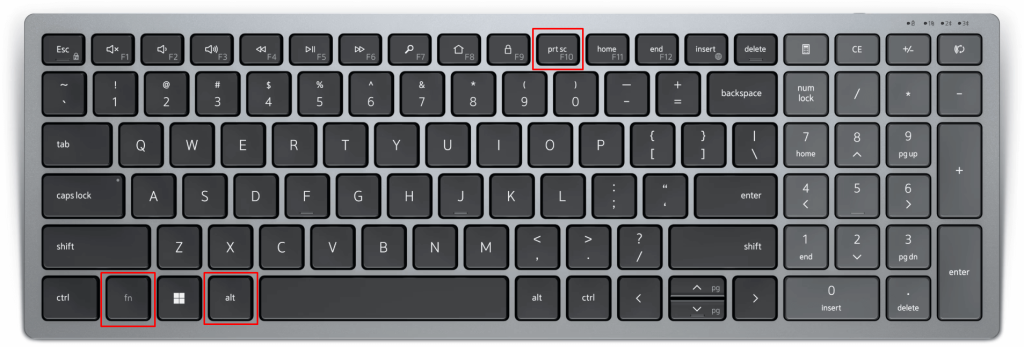
Press the Alt and Print Screen keys simultaneously if you want to take a screenshot on the active Window. The screenshot will be copied to the clipboard automatically.
Open the Paint app and paste the screenshot to save it on your device.
Method 3 – Using Windows + Print Screen Keys
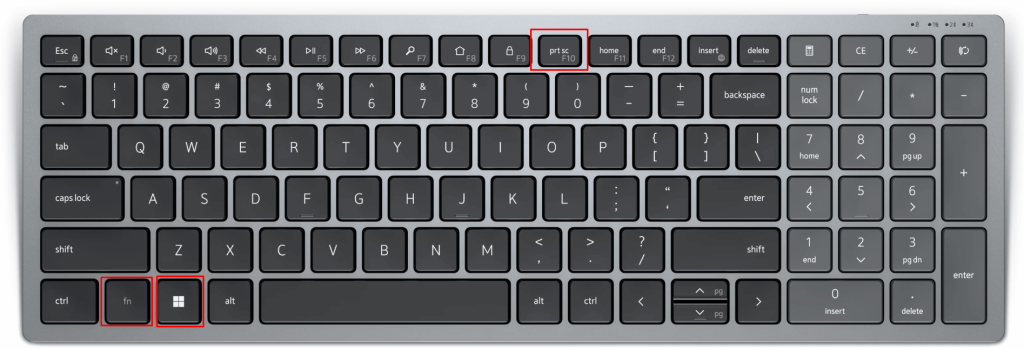
Instead of saving screenshots with the Paint tool, you can directly save the screenshots on your Windows computer by using the Windows + Print Screen keys.
By tapping those keys, your entire screen will be captured, and the screenshot will be saved on the following location automatically.
C:\Users\Name\Pictures\Screenshots
How to Take Screenshots on Windows 7, 8.1, 10 & 11 Using Snipping Tool
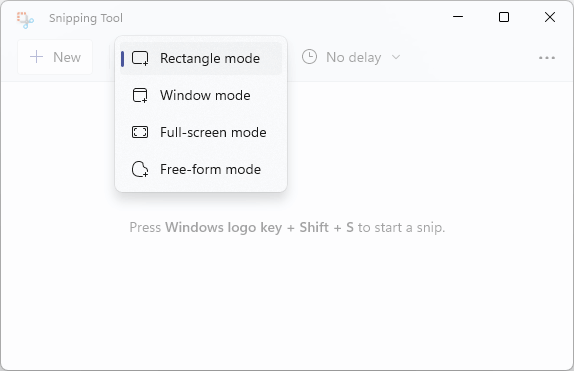
Snipping Tool is a built-in tool available on Windows computers (Windows 10 – Snip & Sketch) to take screenshots. Unlike the keyboard shortcuts method, you can take screenshots in four different modes:
- Rectangle Mode: Take a screenshot in the rectangle shape.
- Window Mode: Take a screenshot of the Window
- Full-screen Mode: Take a screenshot of the entire screen
- Free-form Mode: Take a screenshot of any form on your screen
Another advantage of this method is that you can set a timer to take a screenshot. You can configure it to Snip the screen after 3 secs, 5 secs, & 10 secs.
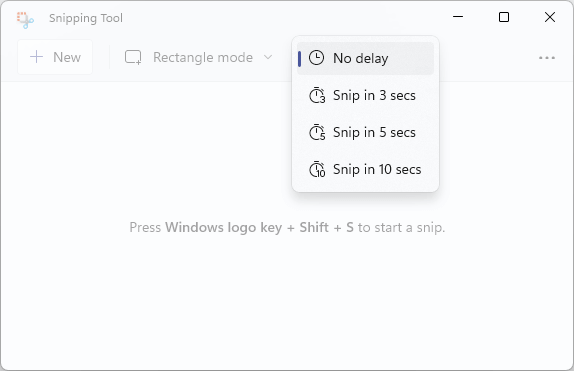
Launch the tool by pressing the Windows + Shift + S keys simultaneously. Or, head to the Start menu and search for the Snipping Tool to launch it.
By default, it will open with the rectangle mode. Choose the mode you want and take a screenshot. After taking a screenshot, a notification will appear in the bottom right corner.

Select the notification, and the Screenshot will open on the Snipping Tool image editor automatically. The editor has basic editing tools like
- Ballpoint pen
- Highlighter
- Eraser
- Ruler
- Touch Writing
- Image Crop
- Undo/Redo
- Zoom
After editing the image, tap the Save icon and save the image to the desired location. Right from the Snipping Tool editor, you can also share the screenshot via Onenote and Twitter.
How to Take a Screenshot on Windows PC or Laptop Using Game Bar
It is a built-in tool on Windows computers to take a screenshot while playing games. You can also use it to record your gameplay.
First of all, ensure that the Game bar is enabled on your Windows computer (Open Settings → Gaming → Xbox Game Bar → Turn on the toggle).
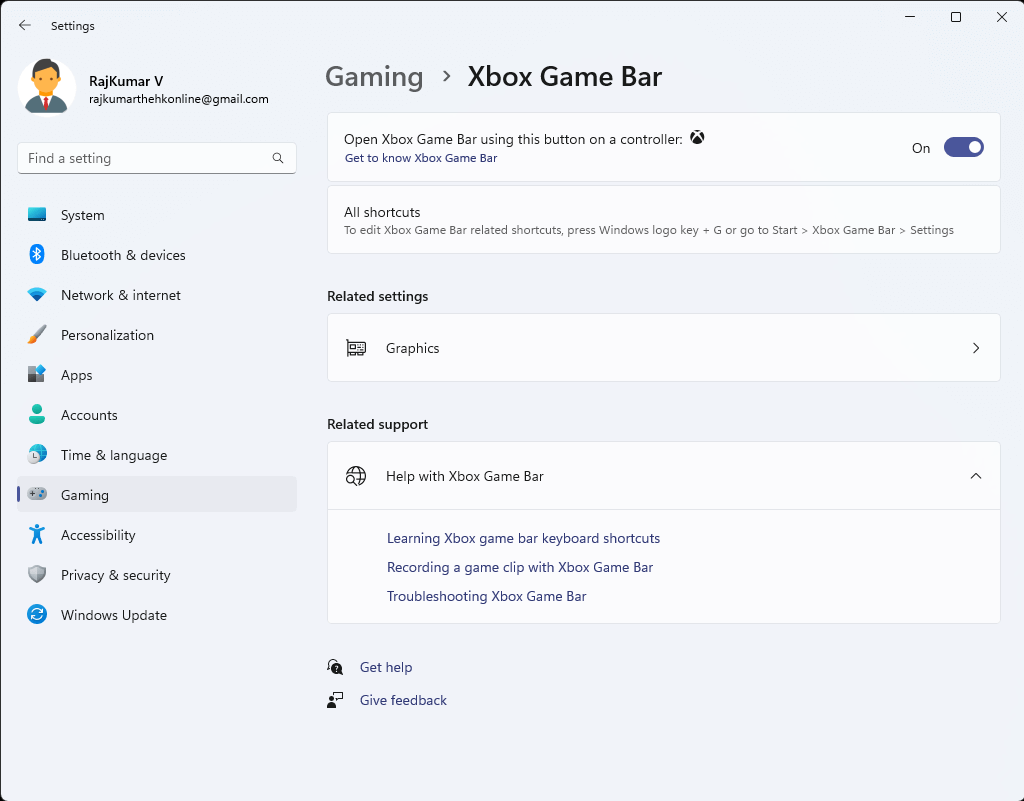
Now, press the Windows + G keys to open the Game bar. Tap the Capture icon on the menu bar and choose the Camera icon.

The tool will take a screenshot of your current window, and you can find the image at the following location. By default, the image will save in the PNG format.
C:\Users\Name\Videos\Captures
5 Best Free Tools to Take Screenshots on Windows
As you can see, the Paint and the Snipping Tool image editor lacks several image editing tools. You can’t use them to enhance your screenshots. At the same time, you can’t take Scrolling Screenshots with the above methods. Hence, it is advisable to use trusted third-party tools to capture the important things on your screen.
There are plenty of screenshot tools available online. We have listed the top five free tools that are widely accessed by people across the world.
ShareX is a free and open-source tool that you can use to take screenshots and record your screen on Windows. Apart from Windows PC, it is also available for the Mac platform.
Highlights:
- Add watermarks to the screenshots.
- Get shortened URL to share your screenshot.
- Add effects to the screenshots.
- Save the screenshot in different formats.
1. Download the ShareX exe file on your Windows from its official website.
2. Run the file and install the tool on your PC.
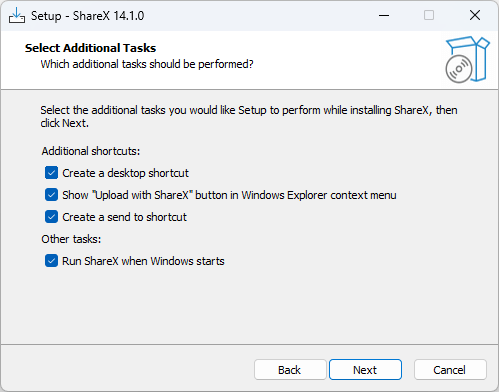
3. Launch the tool, and it will display all the hotkeys on the home screen.
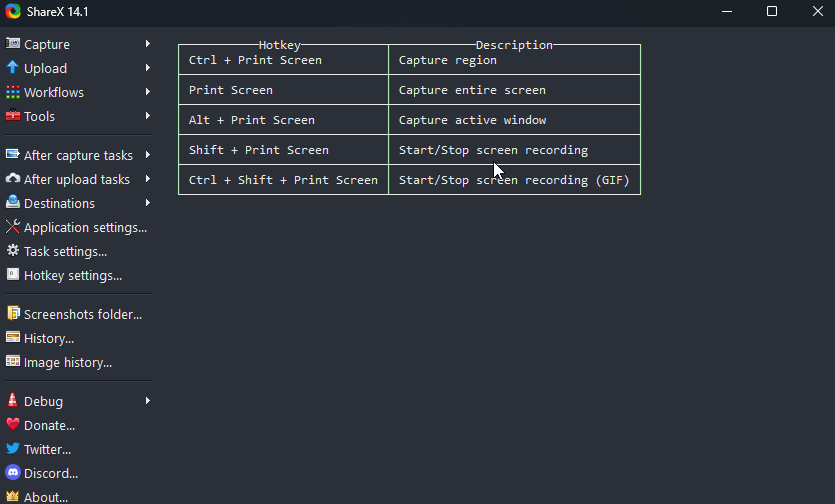
4. Tap the Hotkey settings on the left-side menu pane if you want to customize the hotkeys.
5. Now, take the screenshot by pressing the necessary hotkeys.
6. The screenshot will save on the Documents/ShareX Screenshots folder automatically.
Lightshot
It is a lightweight screenshot tool to install on Windows. Like ShareX, you can get a link to share the screenshot on the internet.
Highlights:
- It is a free screenshot tool.
- Copy the screenshot to your Clipboard and paste it anywhere you want.
- Edit the screenshot with various tools like pen, brush, and more.
- Save the screenshot on your Windows in the required format.
How to Use Lightshot on Windows:
1. Visit the official site of Lightshot and install the app on your Windows.
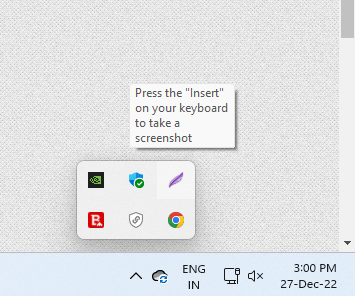
2. Click the Lightshot icon from the Action center. You can also choose the shortcut Key of the Print Screen.
3. Capture the region you want.
4. The Lightshot will display the editing tools to customize the image.
5. After annotating the screenshot, save the image to your PC.

6. To customize the hotkey of Lightshot, right-click the Lightshot icon → Choose Options → Tap Hotkeys → Customise the Hotkey.
Greenshot
Greenshot is another light-weigh screenshot tool for Windows. By downloading this tool, you can capture the entire window or screen.
Highlights:
- Capture scrolling web pages on all browsers.
- Save the screenshot or send it to external devices like Printer.
- You can export the screenshot in various formats.
- You can directly upload the screenshot to sites like Flickr, Picasa, Imgur, and more.
How to Use Greenshot on Windows:
1. Install the Greenshot Screenshot tool on your computer or laptop.
2. Upon installing the app, the Greenshot icon will appear on the Action Center.
3. Right-click on it and choose the screenshot mode (Region, Last region, Window, Full screen, Internet Explorer). Alternatively, use the shortcut keys mentioned next to the mode.
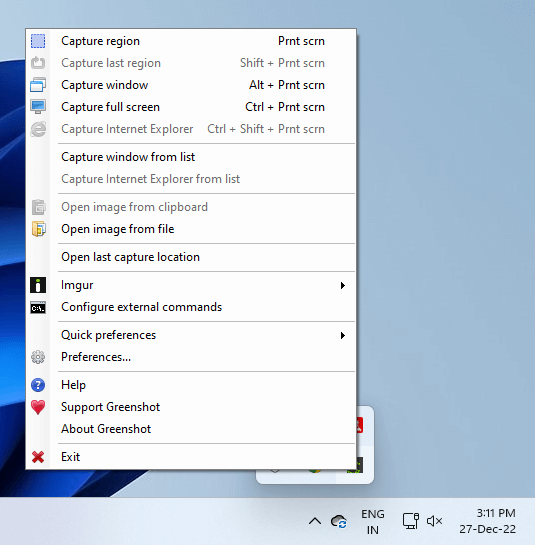
4. Capture the region you want, and it will display different options.
5. Tap the Save directly option if you want to save the image automatically on the pre-assigned location. If you want to save the screenshot in a different location and format, tap the Save as option.
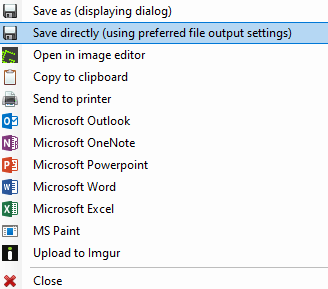
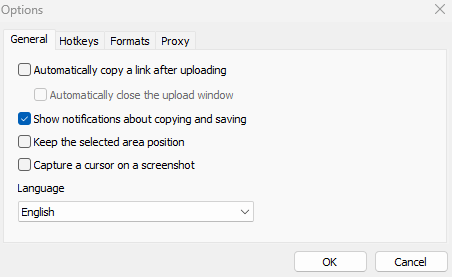
6. To configure the default location and image format setting, right-click the Greenshot icon on the Action Centre → Choose Preferences.
Duckshot
Duckshot is the next one on our list. Like other tools, it comes with a built-in editor to enhance the screenshot.
Highlights:
- It supports scrolling capture on web pages.
- You can save the screenshot in different formats like PNG, JPG, BMP, GIF, and many more.
- You can also use this tool to screen record.
- You can easily access various functions on the tool with hotkeys.
How to Use Duckshot on Windows:
1. Install the Duckshot tool on your computer.
2. Press the Print Screen key on your keyboard and drag the edges to the required position. Use the available tools to enhance the screenshot.
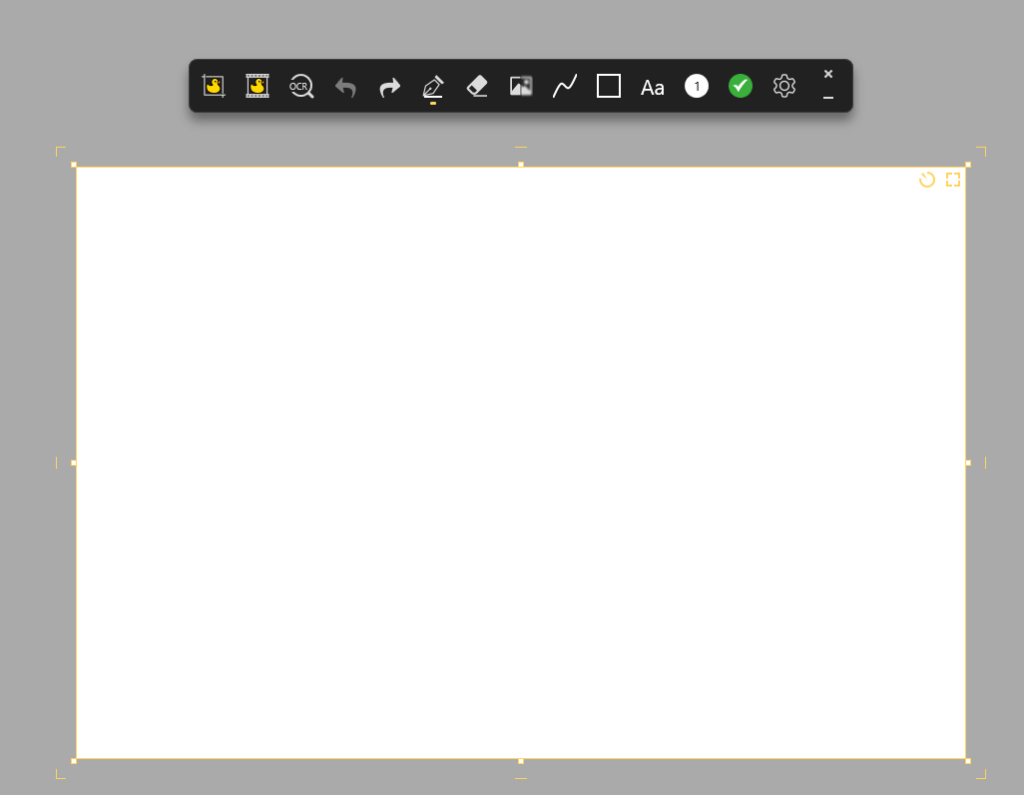
3. Now, tap the Duck icon.
4. Here, you can resize the screenshot by manually entering the required size.
5. Tap the Save icon and the image will be saved to the Pictures/Duckshot folder.

PicPick
PicPick is an all-in-one tool to download on Windows. You can use it as a screen recorder, color picker, image editor, and more. It also has premium version but the free version is more than handy to take screenshots.
Highlights:
- From the image editor, share your pictures via Email, Facebook, Twitter, Dropbox, OneDrive, Box, and more.
- You can enhance the screenshot by customizing it with tools like a highlighter, motion blur, color balance, saturation, watermarks, and more.
- Configure a hotkey to take the screenshots conveniently.
- Automatically store the image in the desired location.
How to Use PicPick on Windows:
1. Install the PicPick tool on Windows by downloading the .exe file from its official website.
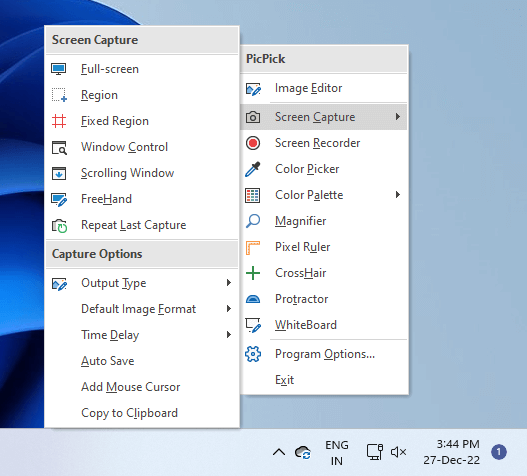
2. After installing the app, click the PicPick icon on Action Centre.
3. Select Screen Capture and choose the mode you want (Full Screen, Region, Fixed Region, Window, Free Hand, or Scrolling Window).
4. Upon taking the screenshot, the image will open on an editor. It will look similar to the Microsoft Word dashboard.
5. Edit the image with the available tools and save it to the desired location.
Tip! Visit our best Windows screen recorder to record the important things with various options and tools.
How to Take Screenshots on Microsoft Surface
Like smartphones, you can easily take screenshots on Microsoft Surface by pressing and holding the Power and Volume Down buttons. Microsoft Surface also has a built-in Snipping Tool, which you can launch by simply tapping on the Windows + Shift + S keys.
Frequently Asked Questions
Using the Snipping tool and third-party screenshot tools is the best way to take screenshots with Print Screen. On third-party tools, you can configure the required hotkeys for taking screenshots.
If you have connected the magic keyboard to the Windows computer, try the following shortcuts to take screenshots.
Entire screen: Fn + Shift + F11
Active screen: Option + Fn + Shift + F11