The screenshot is a great way to capture the things you’re viewing on any device screen. You can use that screenshots for troubleshooting, blogging, training, and much more. With Apple TV, it is not as easy to take screenshots. You need to connect a Mac with the 4th Gen Apple TV or later to take a screenshot. To take screenshots on Apple TV, the Mac must run on macOS High Sierra or later, and your Apple TV must run on tvOS11 or higher. The screenshots can be viewed on your Mac. In this guide, we will explain how to take screenshots on Apple TV.
Contents
How to Take Screenshot on Apple TV Using You Mac
There are two methods to take screenshots on Apple TV. Let us discuss both methods with the necessary screenshots.
- Using QuickTime Player
- Using Xcode
Steps to Take Screenshot on Apple TV using QuickTime Player
[1] Turn on your Apple TV and connect it to a WiFi connection. Also, connect your Mac to the same WiFi network.
[2] Open Quick Time Player on your Mac.
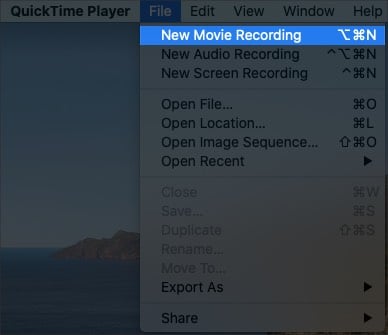
[3] Click on File in the QuickTime Player menu bar.
[4] Select New Movie Recording.
[5] Click on the dropdown arrow next to the record button.
[6] Select your Apple TV under the Camera and Microphone sections.
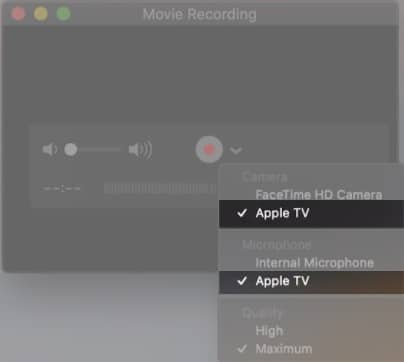
[7] Now, you will see the Apple TV content on the Mac screen.
[8] To take a screenshot, press Shift+Command+4 on the keyboard and press the Space bar. It will now turn your cursor to the camera icon.
[9] Wait until QuickTime Player’s interface disappear.
[10] Now, click the trackpad or mouse to take a screenshot. To record your Apple TV’s screen, click the red Record button.
[11] To save the recorded Apple TV video, go to File > Save. By default, the image will be saved to your desktop on your Mac.
Steps to Take Screenshot on Apple TV using Xcode
You can use these steps to take Apple TV screenshots with a Mac, which runs on lower versions.
[1] Connect Apple TV to your Mac using a USB-C cable.
[2] Plug the Apple TV and connect it to the TV using an HDMI cable.
[3] Install and open Xcode from the Mac App Store.
[4] Click on Windows and then select the Devices menu.
[5] Select Apple TV from the list of devices.
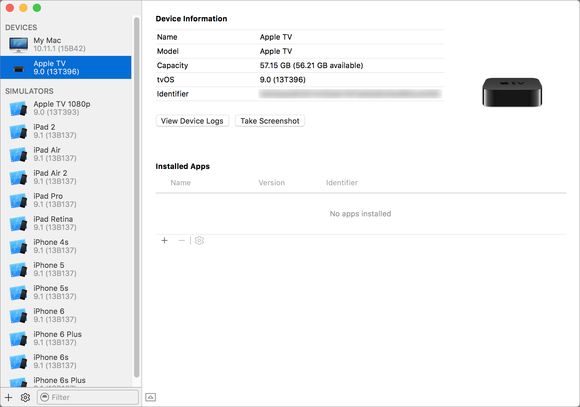
[6] Now, click on Take screenshot. It will be saved automatically to your desktop.
These are the two easy ways to grab screenshots on Apple TV. Now, you can edit and share your Apple TV screenshots with others whenever you want. If you have any queries or feedback related to this guide, use the comments section to mention them. Meanwhile, hit the follow button on our Facebook and Twitter pages to read our tutorials instantly.