For most people, the iPhone stores lots of photos, videos that were taken in users’ everyday lives. Sometimes, you will need to transfer photos from your iPhone to another iPhone. For example, when you take a nice picture, you would immediately send it to your friend. Or if you have a new iPhone, while keeping a large number of images that you don’t want to lose on the old one, you will find a way to quickly transfer photos to the new iPhone.
Actually, there are lots of ways to send data between iPhones. Refer to the following content, and it covered the 4 commonly used methods to transfer photos from iPhone to iPhone.
Contents
Method 1. Sync photos between iPhones via iCloud
iCloud is a great tool allowing you to access your photos and other data that are uploaded to your iCloud storage. You can enable the “iCloud Photos” feature on your iPhones, and your Photos app will be synced between the two devices.
Step 1. Go to “Settings” > “[Your Name]” > “iCloud” > “Photos”.
Step 2. Toggle on the “iCloud Photos”.
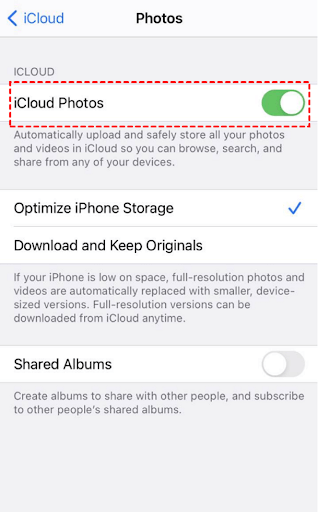
Then your photos on this iPhone will be uploaded to your iCloud as long as it contains enough space.
Step 3. Open the new iPhone, do the same steps to enable the “iCloud Photos” feature. Then photos will be downloaded from the source iPhone.
Note:
- If the target iPhone is brand new, you may need to complete the on-screen setup and sign in with the same Apple ID.
- iCloud is based on an internet connection, so please make sure you have a stable network condition.
Method 2. Backup and restore the whole iPhone use iTunes
iTunes can backup your iPhone and restore it to another iPhone without syncing. It is not as easy as iCloud, and it will move other data on your iPhone, but it is still worth a try. It does not have a storage limit and it is a good choice if you have a new iPhone to keep the previous data.
Note: iTunes will backup and restore most iPhone data including photos, you can check what does iTunes Backup includes to know more information.
Step 1. Attach the source iPhone with your computer. Install and launch iTunes on your computer.
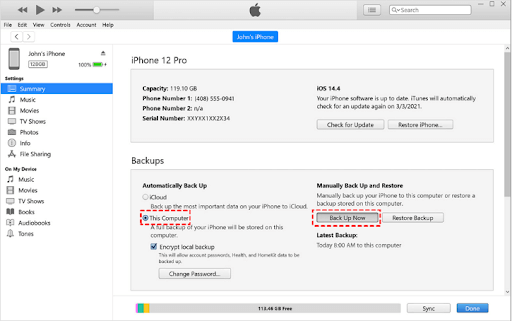
Step 2. Choose the “Summary” tab on the left pane of iTunes.
Step 3. Choose “This Computer” under Backups, then hit “Back Up Now”. Then follow the prompts to back up the whole iPhone.
Step 4. Once the backup process the complete, connect the target iPhone with the computer.
Step 5. Choose the “Summary” tab, and click “Restore” to restore the backup image to the connected iPhone.
Method 3. Selectively transfer photos between iPhone without syncing
iCloud and iTunes are official solutions to send data between iPhones. You may not satisfy with them because iCloud storage is limited, and iTunes is not flexible. Then AOMEI MBackupper can help you. It is a professional iPhone data transfer tool enabling you to make a backup of your photos on your computer and restore them to another iPhone, iPad, or iPod Touch. So, you don’t bother by the storage limit.
Besides, you can only transfer your favorite pictures on your iPhone with AOMEI MBackupper. It supports choosing specific photos to share with another device. Next, we will guide you through how to use this transfer tool.
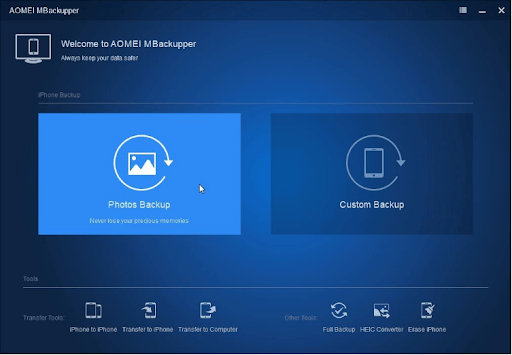
Step 1. Run AOMEI MBackupper, and click “Photos Backup”.
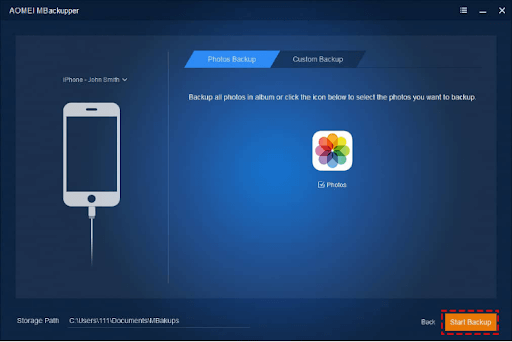
Step 2. Click the “Photos” icon.

Step 3. Here you can view your photos are separated by your photo albums. Choose your favorites and click “OK”.

Step 4. Click “Start Backup” to save photos on your computer.
Step 5. Disconnect the source iPhone, and plug in the target iPhone.
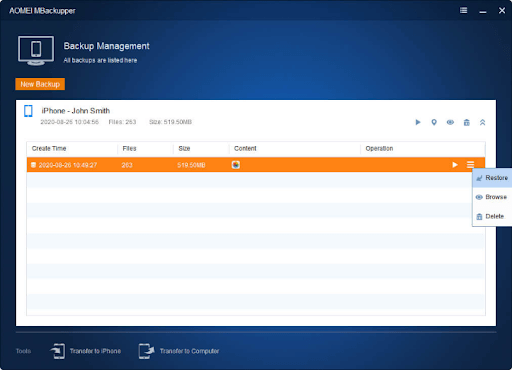
Step 6. On the Backup Management, select the photo backup, and click “Restore”.
Method 4. Airdrop photos between iPhones
Airdrop is a convenient way to transfer files between different Apple devices. It depends on Bluetooth and Wi-Fi connection, so you need to turn on the two features on the Control Center. But if need to transfer a large number of photos, Airdrop is not the best option because the speed can be very slow.
Note: Your iPhones need to be running with iOS 7 and later. It probably not works well with some old iPhone models.
Step 1. Go to the “Photos” app on your iPhone.
Step 2. Tap the “Select” option and choose the photos you want to transfer.
Step 3. Tap the “Share” icon, and select “Airdrop”.
Step 4. Select a person or device.

Step 5. On the target iPhone, it will ask you if accept these photos. Tap “Accept”.
Wait for the transfer process to get finished, and it will say “Sent” on the device name.
Conclusion
With the above 4 methods, you can easily transfer photos from one iPhone to another. Hope this post can really help you to share the photos you like between iPhones. In addition, if these pictures or other data are really important to you, we suggest you backup your iPhone photos to a PC to protect them from loss.
Follow Techowns’ Facebook and Twitter pages to stay connected with us.