Chromecast by Google is the most portable media player that relatively occupies less space. If you consider replacing your existing cable TV subscription, then Chromecast is worth buying. It lets you stream the internet streamed contents on the HD TV with the Google Cast technology. Over the years, we could see an increase in the number of apps with cast feature support. Chromecast is definitely the best digital media player to stream movies, shows, music, and even your media files on the big screen. Just like any other device, you can root Chromecast to take advantage of its benefits and developer features.
However, rooting a Chromecast device isn’t that simple and straightforward. You have to get involved with lots of hardware and software installation. Upon rooting, you will be able to custom ROM, change DNS settings, access region-restricted apps, etc. If you want to know the procedure to root Chromecast, then get into the section.
Contents
How to Root Chromecast?
Rooting Chromecast isn’t a simple task. It takes some time and you need to carry out the procedure given below.
Hardware Requirements:
- Buy Teensy 2.0 ($16) or Teensy++ 2.0 ($24)
- Externally powered USB OTG cable
- USB flash drive with 1GB of minimum storage
- A micro USB cable and USB mini cable
- AC Adapter for Micro USB cable (otherwise use the one that came with Chromecast)
Software Requirements:
Make sure you download the following on your Windows desktop PC after connecting the USB flash drive into it.
- GTVHacker zip file by visiting http://download.gtvhacker.com/file/chromecast/HubCap.zip
- Win32DiskImager by visiting http://sourceforge.net/projects/win32diskimager/files/latest/download
(1). With the download, run the Win32DiskImager file as an administrator.
(2). Check if the Drive Letter selected matches the USB flash drive.
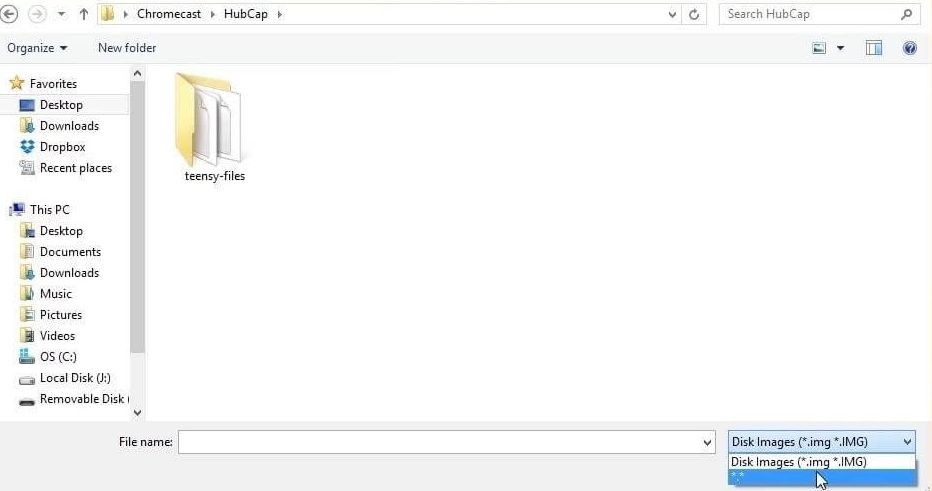
(3). Then click on the Folder icon to browse for the HubCap folder in which the ZIP files are unpacked.
(4). Change the file type to Disk Image (*.img *.IMG) and you will find two new files.
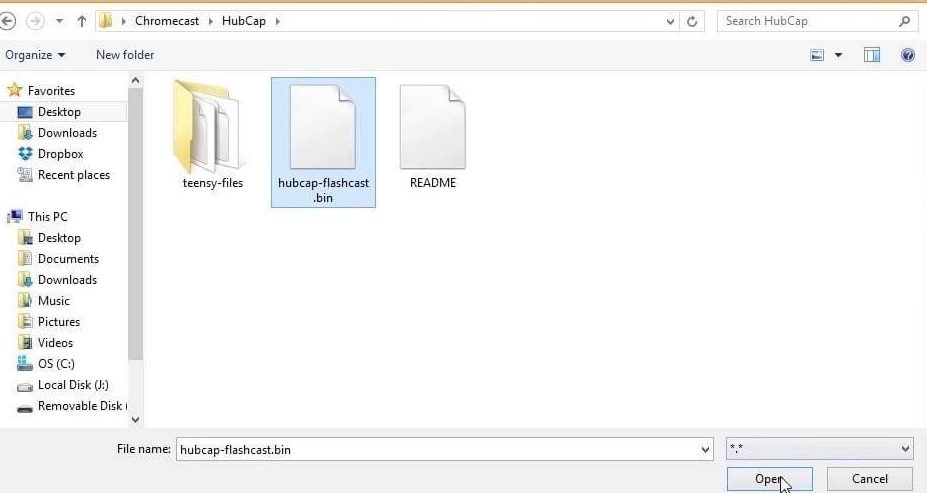
(5). Select hubcap-flashcast.bin and then tap on Open.
(6). Click on Write to write the file into the USB device and just wait for the process to end with a confirmation pop-up.
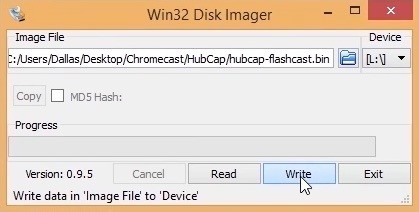
(7). Go to This PC and right-click on the flash drive name to select Eject.
Steps to Install HubCap on Teensy
(1). Connect Teensy to PC with the help of USB Mini cable.
(2). Run teensy.exe file and navigate to the File menu to select Open HEX File and browse to the Hubcap directory.
(3). The file names prefixed with plusplus represents Teensy++ while the regular ones corresponds to Teensy 2.0. Choose the file based on the Chromecast.
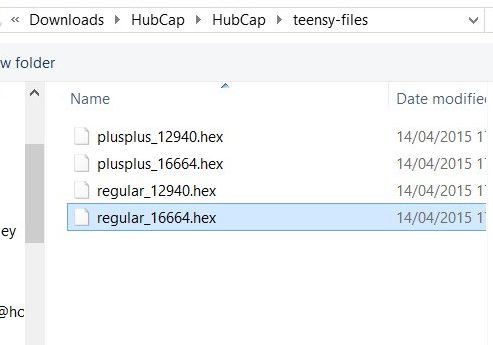
Note: If you have a brand new Chromecast, select the file with 12940 and those used Chromecast users can click on the file with number 16664.
(4). A prompt on the screen will ask you to press the Button on Teensy. Press the button just below the flashing blue light.
(5). Now click on the second button from the right on the Teensy Loader Window on PC.
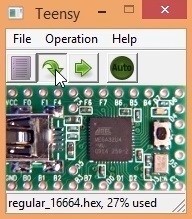
(6). Wait until you see a Download Complete message to appear on Teensy Loader window.
Steps to Root Chromecast
(1). Connect Teensy into a USB Mini cable again.
(2). Then, plug the larger end of the cable into the female port on the USB OTG cable.
(3). Now, plug the Micro USB cable and AC adapter into the power supply and then plug the Micro USB into the female end of the USB OTG cable.
(4). Connect your Chromecast into the remaining port i.e., male Micro end.
(5). Meanwhile, press and hold the Reset button available at the side of the Chromecast.
(6). Keep holding it and check if Teensy shows a flashlight. With this, gently go of the reset button.
(7). Wait for the light to stop flashing. After a minute, you should disconnect Teensy and the USB Mini cable from the USB OTG.
(8). Now, plug the USB flash drive into the empty slot of the USB OTG cable.
(9). With this, press Chromecast button once to start the rooting process.
(10). Wait for some time and it varies based on the Chromecast model you have. Once done, you will be notified as completed.
(11). Then disconnect Chromecast from USB OTG cable and plug the Chromecast back to your TV.
How to Verify Chromecast Rooting?
(1). Open the Chromecast app on your phone and tap on the Chromecast device to activate it.
(2). Scroll down to find the IP address.
(3). Open the browser on any other device connected to the same network as that of Chromecast.
(4). Enter the same IP address and if the root was successful, then you will be able to see Eureka ROM’s settings page.

To Conclude
That was all about rooting Chromecast. Make sure you follow all the steps in the right order. Be careful and cautious while rooting as it may cause any damage to Chromecast. This procedure is applicable to all Chromecast versions including 1st Gen, 2nd Gen, and Ultra 4K. You may perform this task at your own risk and we aren’t responsible for further issues.
Hope you find this section useful. In case of any queries, ask it using the comments section. Follow us on Facebook and Twitter to get updates about new articles.