WoL, an abbreviation for Wake-on-LAN, is an Ethernet networking standard that allows any computer on a network to be turned on or awakened by a specific network message. While sometimes things may not work out well, this article discusses how we can fix Wake on LAN not working on clients running Windows 10 and Ubuntu.
Contents
- Reasons for Wake on LAN Not working on Windows 10/11
- Disable Fast Startup
- Update the NIC driver
- Disable Power-saving Mode
- Configure NIC Power Settings
- Configure NIC Advanced Driver Settings
- Check BIOS settings
- Reset BIOS
- Update BIOS when Wake on LAN is not working
- How to diagnose Wake on LAN not working in Ubuntu
- How to Wake on LAN using PowerShell?
- Frequently Asked Questions – Wake on LAN not working
Reasons for Wake on LAN Not working on Windows 10/11
- Disable Fast Startup.
- Update the NIC driver.
- Change Power Plan, try to disable power-saving mode.
- Configure NIC Power Management settings.
- Configure NIC Advanced Driver Properties
- Check BIOS settings
- Reset BIOS
- Update BIOS
Disable Fast Startup
By all means, Windows 8 OS was the first by Microsoft to introduce the Fast startup feature. However, now it is now a norm in all the preceding versions of Windows. To disable Fast Startup, you would need to do the following:
1 – Hit the Windows key, to open the start menu.
2 – Type in Power Options.

3 – Now open Power & sleep settings from the matching apps list.
4 – Next locate Additional Power Settings button on the right sidebar of the Power & sleep settings window.

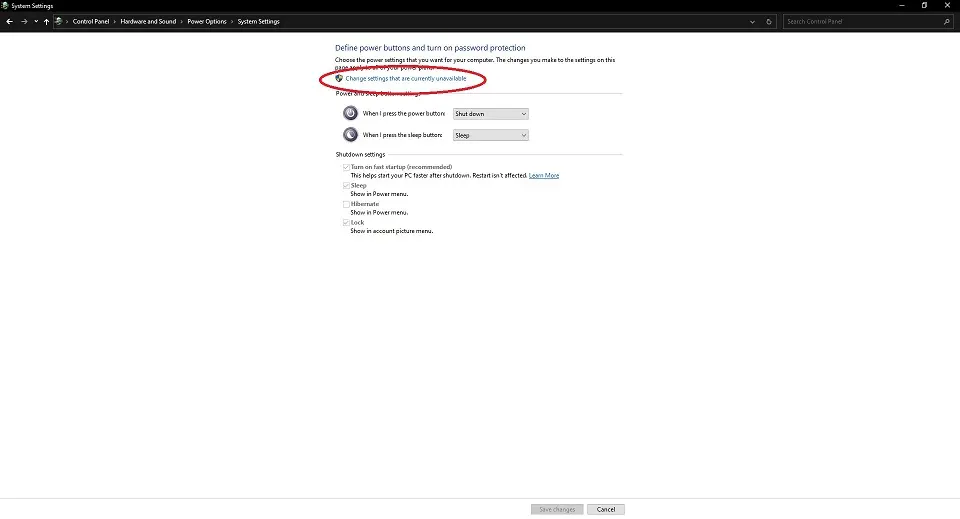
5 – Click on Choose what the power buttons do option from the left sidebar.

6 – Click on Change settings that are currently unavailable.
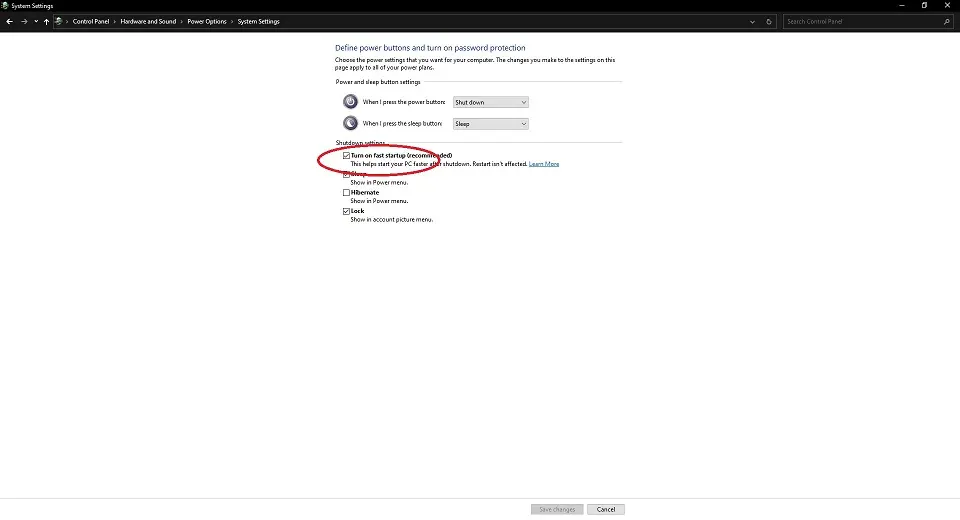
7 – Locate the checkbox with a text label adjacent to it labeled as ‘Turn on fast startup‘.
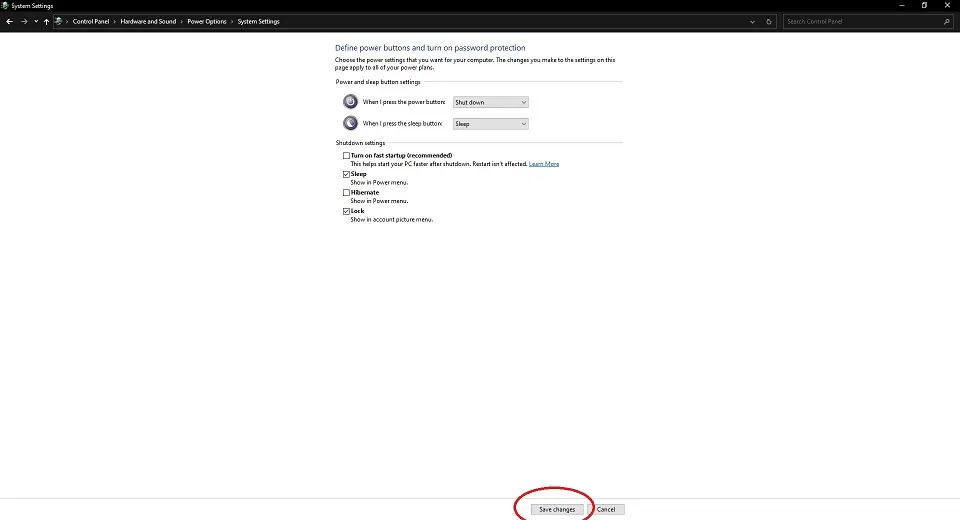
8 – Uncheck the checkbox.
9 – Once unchecked, click on the ‘Save changes‘ button at the bottom of the screen or window.
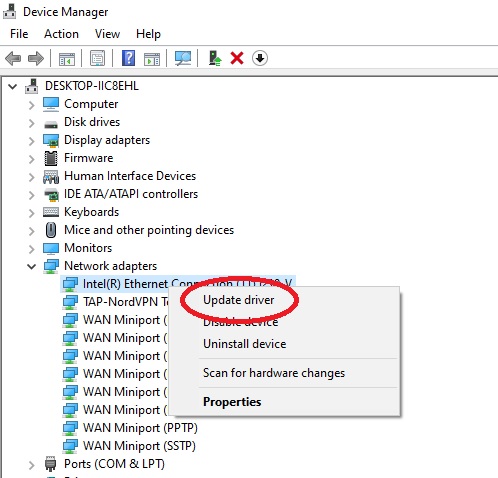
Update the NIC driver
If the NIC drivers are not updated, Wake On LAN may fail.
- In the first place, try to update the drivers using the Device Manager window.
- Also, try to download the NIC software from the manufacturer’s website.
To open Device Manager
- Press Windows + X key first to bring up the Power User options menu.
- On the floating menu on the left side. Look for the option labeled Device Manager.
- Click on the Device Manager option.
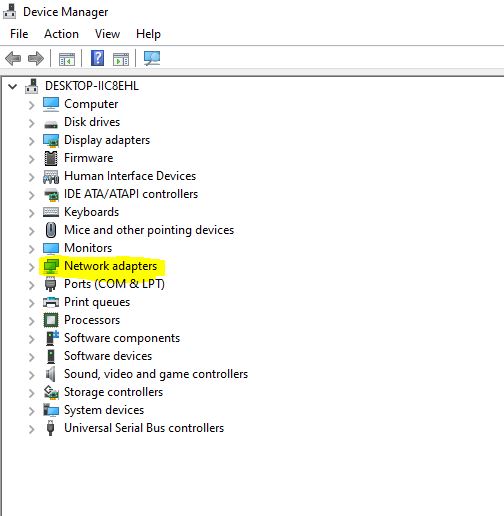
- On the Device Manager window, locate the item Network adapter, and click on the chisel icon (>) to expand and see the list of all Network adapters.
- Look for your network card on the list of Network adapters.
- Right-click on your NIC Card.
- Click on Update Driver for Windows to look for all available drivers for the selected NIC card.
NOTE: On Click Update Driver. The system would take some time to search for drivers from its repo. Restart the PC, if prompted. However, not required always.


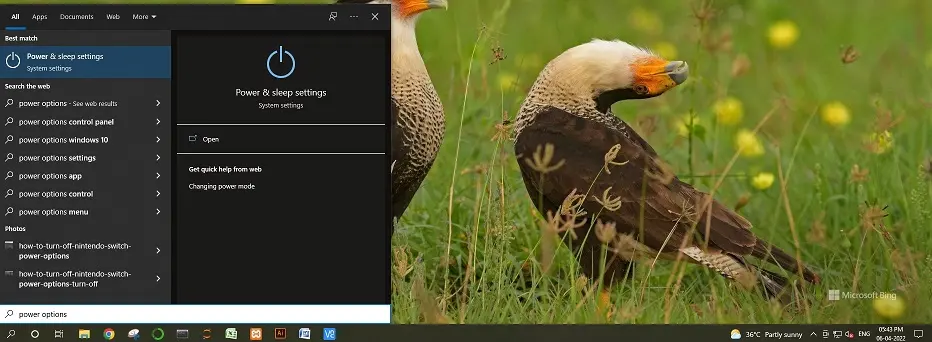
Disable Power-saving Mode
To Disable the power-saving mode
- Press the Windows key on the keyword.
- Type in the phrase ‘Power Options‘
- Then look for the Windows app with the label ‘Power & sleep settings‘, on the ‘Best match‘ section on top of the start menu.
- Click to open the ‘Power & sleep settings‘ window.
- Locate the option ‘Additional power settings‘ on the right side of the ‘Power & sleep‘ settings window.
- On the next screen, from the list of all the power plans, click on ‘Change plan settings‘ next to any one of the power plans.
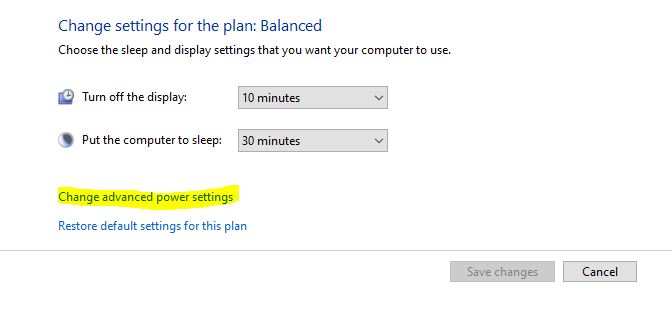
- On the next screen. Locate the option ‘Change advanced power‘ settings as highlighted in the below image. Furthermore, click to open advanced power settings.

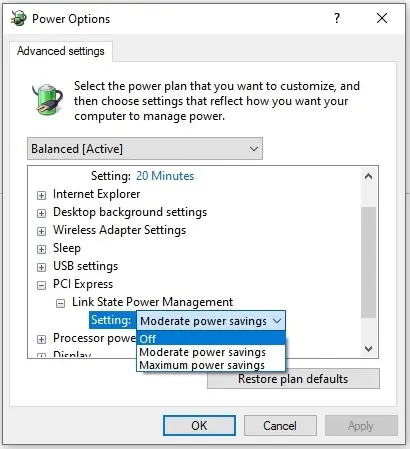
Configure NIC Power Settings
When sending the magic message. However, it is sometimes possible that the Network Interface Card itself may have been in a low power state.
As a result, the Wake on LAN was not working properly.
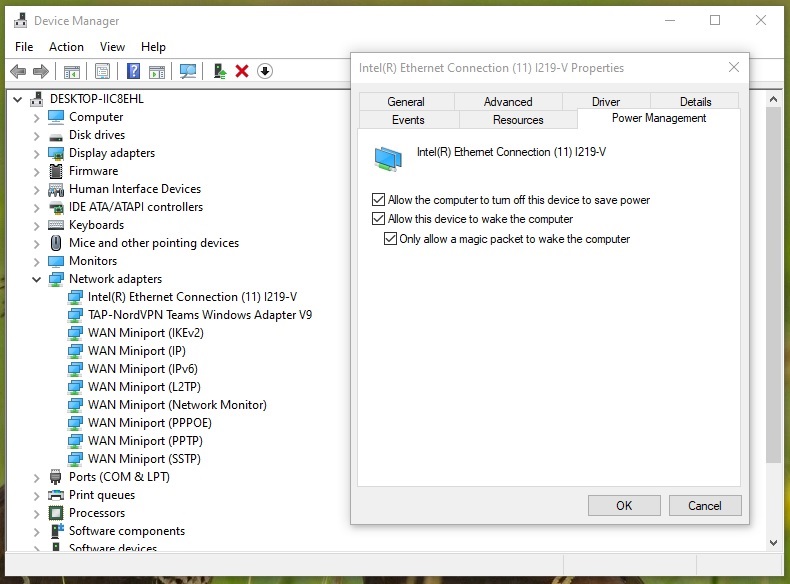
To fix Wake on LAN not working, we need to check the Network card power management settings properly. To do so :
- Firstly, press Windows + X key, to bring up the Power User menu.
- Next, open the Device Manager from the floating menu which appears above the taskbar.
- Again, expand the Network Adapters tab to show all Network devices.
- Correspondingly, identify your primary Network Interface Card.
- Right-click on your primary Network Interface Card on the list.
- Subsequently, click on the Properties option.
- On the Network Card Properties window. Thereupon, open the Power Management tab.
- In conclusion, check all the three checkboxes as shown in the figure below.
- Finally, click on the close button.

Configure NIC Advanced Driver Settings
Even though, in the last section, we discussed how we would enable Wake on LAN using a magic packet. However, in Windows, there are additional settings that may restrict network card access. Follow the steps below to enable some more Advanced Options on your primary Ethernet Network Interface Card.
1. To begin with press Windows + X. Thereupon the system would show the Power User menu.
2. Then, click on Device Manager.
3. In the first place, expand and see the list of Network Devices. by clicking the Chisel icon on its left side.
4. Then identify your primary ethernet network interface card from the list.
Check BIOS settings
Shut Down or Restart your PC, then hit the Del key or F10 key to enter the BIOS settings page.
Please make sure that the following settings exist inside your BIOS:
- Make sure that the Deep Sleep option, if at all your motherboard supports, is set to Disabled, because this would put your NIC / Network Card / Ethernet to sleep while the system enters Suspend, Hibernate, or Sleep mode.
- Also make sure that the Wake On Lan option in the Power Management settings or similar page, is set to Enabled.
Reset BIOS
It is highly likely that we may have experimented a lot with BIOS settings. This would actually have made a couple of more important changes to other settings as well. Try to restore to Default values and retry once.
Update BIOS when Wake on LAN is not working
Sometimes an update to BIOS would not harm. However, it may help to make some parameters to the default value. However, this can solve the problem, if we had experimented with BIOS too much, to make the Wake on LAN work on our PC.
How to diagnose Wake on LAN not working in Ubuntu
- Check whether the Wake on Lan service is running by running the following command :
sudo systemctl status wol - Next, you would check if the wol service is enabled by trying to run the command:
sudo systemctl enable wol.service - If the service is not found, you should install the ethtool package in order to get the Wake on Lan service on Ubuntu. To install run the following command :
sudo apt install ethtool - Once installation is completed. Run the command :
ip a - You will find the list of network adapters, your primary network adapter, would appear by the name eth0 or a similar name.
- Once you have found the primary network adapter. Run the following command :
sudo ethtool eth0 - Subsequently, the command line would output the following :
Supports Wake-on: pumbg
Wake-on: d - Next, we would enable Wake on LAN using the following ethtool command:
sudo ethtool --change eth0 wol g - We would check again whether eth0 is being set to Wake on Magic Message. Perform the query by using the following command:
sudo ethtool eth0 - The command line should give the following output :
Wake-on: g - Now get the IP Address of your Ubuntu client or server using the command :
ip route show | grep -i 'default via'| awk '{print $3 }' - Correspondingly you should get an output as follows with your IP address listed in it.
192.168.15.23 - Now it’s time to test the setup. Run the command to put your Ubuntu client or server into suspend mode by running :
sudo systemctl suspend - Now from another Ubuntu machine on the network or remotely try to wake up our Ubuntu machine by trying the command :
wakeonlan -i 192.168.15.23 55:d5:f9:97:fb:7b
Kindly note down that the MAC address is obtained from Step 4, else re-run the command :ip a
Check the MAC address under the adapter labeled as eth0 or similar names. - You must now be able to wake up your machine remotely running on the Ubuntu OS.
How to Wake on LAN using PowerShell?
In order to call Wake on LAN from Power Shell please use the following steps:
1 – Find the MAC Address of the machine you wish to send the Magic Packet.
2 – We would assume that the MAC Address of the machine to be controlled would be as follows: 89:7B:8F:79:95:8B
2 – Open the PowerShell prompt, make sure that you have opened PowerShell with the Run as Administrator option.
3 – Run the command :$Mac = "89:7B:8F:79:95:8B"
Kindly note that you won’t get any Outputs unless there is something wrong with the Syntax of the command that you typed in.
4 – Next type the command :$MacByteArray = $Mac -split "[:-]" | ForEach-Object { [Byte] "0x$_"}
5 – Soon, follow up with the command:[Byte[]] $MagicPacket = (,0xFF * 6) + ($MacByteArray * 16)
6 – Type the following commands step by step to invoke the UdpClient to send the MagicPacket:$UdpClient = New-Object System.Net.Sockets.UdpClient$UdpClient.Send($MagicPacket,$MagicPacket.Length)$UdpClient.Close()
Frequently Asked Questions – Wake on LAN not working
This can be due to fast startup enabled, or your PC going to default value every time you shut down or reboot.