In general, there aren’t any significant alterations in the functionality of File History in the operating systems Windows 10 and Windows 11. In particular, Microsoft deleted File History from the Windows Settings menu, making it impossible to set up file backup operations in that location anymore. When it comes to Windows 10, you may set File History activities in both Settings and the Control Panel.
Furthermore, the methods for configuring File History in Windows 11’s Control Panel are identical to those for configuring File History in Windows 10. The factor that differs is the location of File History inside the Control Panel. However, the Add a folder choice in the Windows Settings for Windows 10 File History enables users to pick files from other non-system discs. However, we could not locate a matching option in the Windows 11 File History.
Suppose you wish to safeguard additional files not already in one of the specific folders picked by File History by default. In that case, you must first place them in one of the directories specified by File History. Overall, the Win10 version of File History performs far better than the Win11 version. However, because Microsoft aims to supplant it with OneDrive, File History will not be that vital for the whole operating system.
Contents
How to Backup with File History
Win11 File History is a broad term. First, copy the specified folders/files and save the document to a location on a separate hard drive. So, if you wish to create a File History restore for your data on Windows 11, you must first prepare an external drive to hold the backup copy. Let us now look at how to back up files using File History on Windows 11.
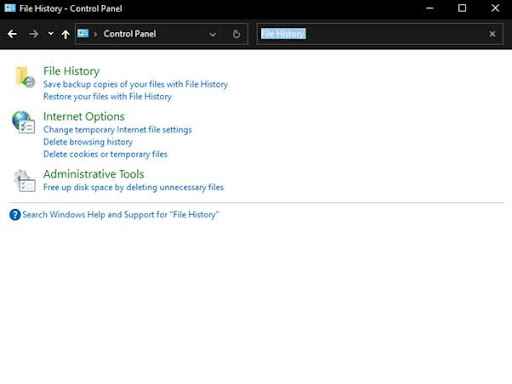
Step 1: Hit the Search in the taskbar’s center and type File history into the search column of the pop-up window.
Step 2: Now, choose File History. It will launch the Windows 11 Control Panel and lead you to it. Then, choose All Control Panel Items, followed by File History.
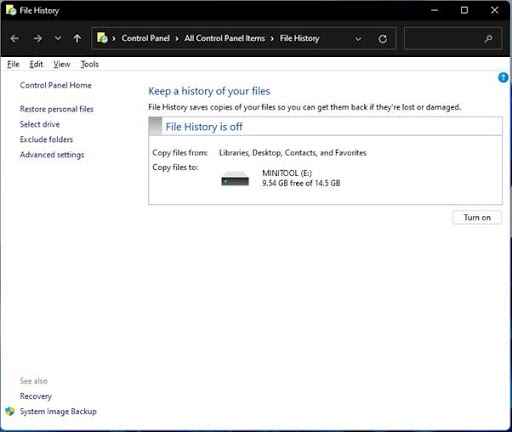
Step 3: If you are happy with the default settings in the right area, including the source files and destination choices, click Turn on to activate File History Windows 11.
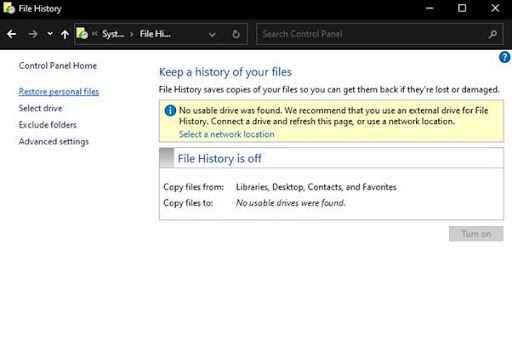
Step 4 (optional): Select the Select drive tab on the left panel if you are dissatisfied with the default setup and wish to customize it. Select the disc you want to use as the file backup location in the new window.
Step 5: Choose Exclude folders to exclude directories you do not wish to back up in the left menu. Then, add the items by clicking the Add button on the new screen. Don’t forget to hit the Save Changes button as well.
Note: You can activate additional crucial options for this File History Windows 11 procedure by choosing the Advanced settings link in the left panel. You may control how often Windows File History checks for file and folder changes behind Save copies of files.
How to Restore File History Backup
Restoring the data is as much important as backing up. For example, sometimes you lose data due to hardware issues, change your laptop or PC, etc. In all those cases, you need to restore the data you backed up using the Windows File History tool.
However, if you don’t know how you can restore using File History backup, these steps will assist you:
Step 1: Launch the Control Panel on your PC. Search File History, and click on it.
Step 2: Click Restore personal files.
Step 3: Browse through the version history of your files and folders using the Left and Right arrows until you find the backup date you want to restore. Then, choose the files and folders to be fixed.
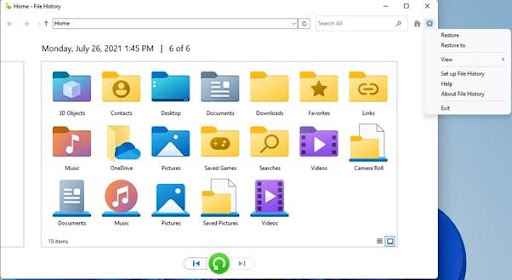
Step 4: Left-click the green refresh icon to restore the files to their original place.
Windows File History Alternative
As you can see, with the Windows 11 File History, there are only a limited number of files users can back up. So which tool should users choose when they want to make a full backup of the computer? We highly recommend every user apply the third-party backup software – EaseUS Todo Backup.
It empowers users to back up everything they want, such as disk/partition, files, or system. Another critical point that users like the most are its design. It is simple; everyone can create a backup with EaseUS Todo Backup with only clicks and points. EaseUS is a software company that provides data recovery, backup & restore, and partition manager solutions for Windows and Mac users. EaseUS also offers a variety of other products like EaseUS RecExperts.
People Also Ask
Is Windows 10 File History still supported?
Microsoft discontinued the File History backup feature in Windows 10 Fall Creators Update earlier in the month. The functionality wasn’t present in some of the recently published Insider versions of the Windows 10 Update, resulting in users thinking that the backup mechanism was going away. As it seems, the backup system will continue after all.
In the newest beta of the Windows 10 Update, build 16226, the File History backup mechanism is back in the Settings app – which means you can now save your data to another disc and restore it anytime you want.
How do I access File History?
You must launch the Control Panel to access the File History on Windows PC. After that, search File History in the search bar at the top right corner. Now, click on File History to access it.
How do I delete File History in Windows 11?
To delete the File History in Windows 11, follow these steps:
Step 1: Access File History through Control Panel
Step 2: Click on the Advanced options, then Clean up versions.
Step 3: Select the period of the File History you wish to delete and select Clean up.
Does Windows 11 have a Backup and Restore?
Files may be restored from a backup produced using Backup and Restore or File History in Windows 11. Link the external storage device containing your backup files to the computer. We recommend using File History to back up your data.
Conclusion
As mentioned above, restoring and backing up your data is essential, but ensuring you do it with an excellent and reliable tool is also necessary. Windows 11 has a built-in file History tool to make it easy. And we hope that with this detailed guide on Windows 11 File History, you now have a better understanding of it!