A screenshot is a static image of the active screen on a device. Taking a screenshot will reduce your work by visiting a screen multiple times. It helps you capture your work done to share with your colleagues or team members which can be more beneficial while explaining something in the form of visuals than in words. You will be able to take a screenshot on all your devices including smartphones, computers, and tablets. Taking a screenshot on a smartphone (Android & iOS) is an easy task, but on a computer or laptop, it is not. If you own a Dell computer or laptop, you should know the effective ways to capture your active screen. The process is the same as you do in a Windows PC or laptop as Dell systems runs on Windows OS. Lets us see how to take a screenshot on Dell desktop or laptop is several methods so that you can go with your best-suited method.
Contents
- Take a Screenshot on Dell Laptop or Desktop using Keyboard
- Capture a Whole Screen on Dell
- Capture a part of the Dell Laptop or Desktop Screen
- Take Screenshot on Dell Laptop or Desktop using the Snipping tool
- Third-Party app to Take Screenshot on Dell Laptop or Desktop
- How to Take A Screenshot on Dell Chromebook?
- Take a Screenshot on a Dell tablet
- To Conclude
Take a Screenshot on Dell Laptop or Desktop using Keyboard
Let us see how you can take a screenshot on Dell using the keyboard keys as this is the primary methods used by many.
Capture a Whole Screen on Dell
(1) Capture and Copy the screenshot
#1: Open the desired screen you want to capture.
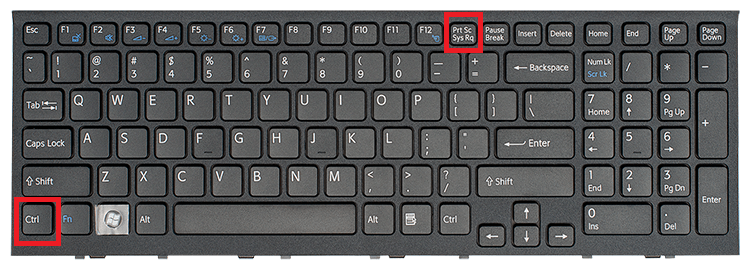
#2: Press the PritScrn key or Ctrl + PritScrn key or Fn + Spacebar to take a screenshot of the whole screen and automatically copy it to the clipboard.
#3: After that open the Paint App or any other image processing app and paste (Ctrl+V) the screenshot.
#4: Click the Edit icon to do some editing and then click the Save icon to save the image to your device location.
(2) Capture and Save a Screenshot
#1: Go to the screen you want to capture.
#2: Press the Windows + Print Screen key, it will capture the entire screen. You can also use the other key combination Fn + Windows + Print Screen.

#3: Captured screenshot will be automatically saved to the Screenshots folder under Pictures.
Capture a part of the Dell Laptop or Desktop Screen
#1: To capture a particular portion of the screen, press Windows + Shift + S keyboard buttons.
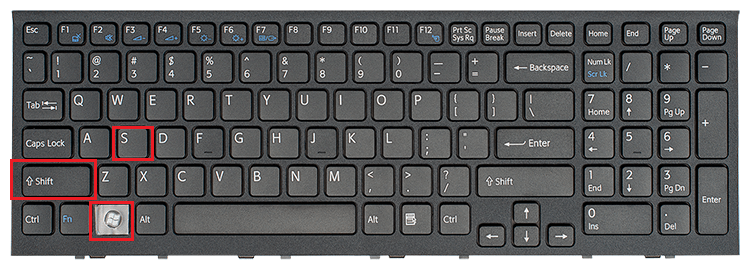
#2: Your screen will turn dim and the mouse cursor will change to Crosshair.
#3: Drag the crosshair to select the portion of a screen and save the screenshot to the device folder.
#4: If you want to edit the screenshot, copy the screenshot and paste it to the Paint app or any other app.
Take Screenshot on Dell Laptop or Desktop using the Snipping tool
If you feel it is difficult to use Keyboard combinations to take a screenshot on Dell computer, the Snipping tool is a perfect solution to get rid of using keyboard shortcuts. The snipping tool on Windows OS is a built-in screenshot application.
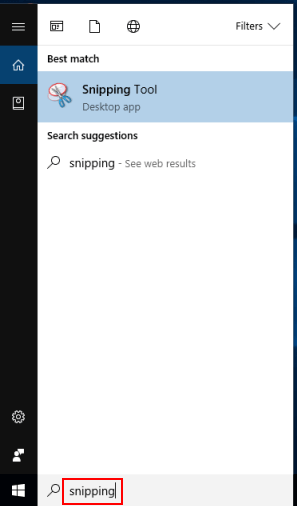
#1: Click the Start button and type Snipping tool in the search field.
#2: Select the Snipping tool app from the search results.
#3: Then click New option on the Snipping tool app.
#4: Next click the Mode drop down and select the Snip Type.
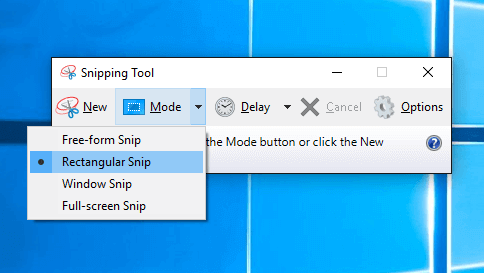
#5: Now select the portion of the screen you want to capture and click save snip icon to save the screenshot to your device folder.
Third-Party app to Take Screenshot on Dell Laptop or Desktop
In addition to the built-in options and keyboard combinations, you can install various third-party screenshot apps on your Dell computer. Some of the screenshot apps for Dell devices are Snagit, Lightshot, king, and many more.
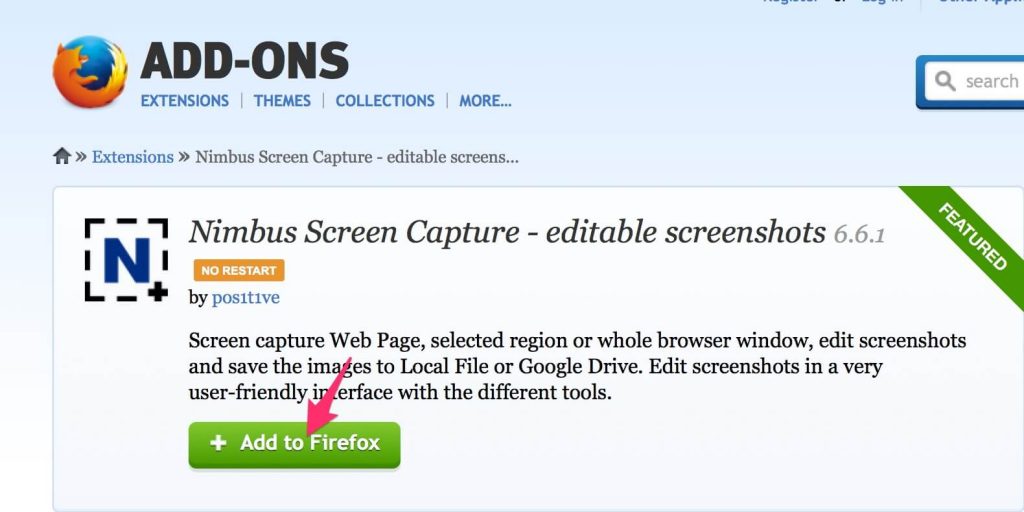
Other than third party apps, some browser extensions are also available to take a screenshot on Dell to capture screenshot of webpages. Some of them are (Chrome extension) and Nimbus Screen Capture (Firefox). With this, you can take a screenshot on YouTube or in any streaming app or site.
How to Take A Screenshot on Dell Chromebook?
Taking a Screenshot on Dell Chromebook is a simple task as the procedure is just the same you follow on a Dell Windows computer. Simply you can use the Keyboard shortcuts to capture an entire screen or a particular portion of the Chromebook window.
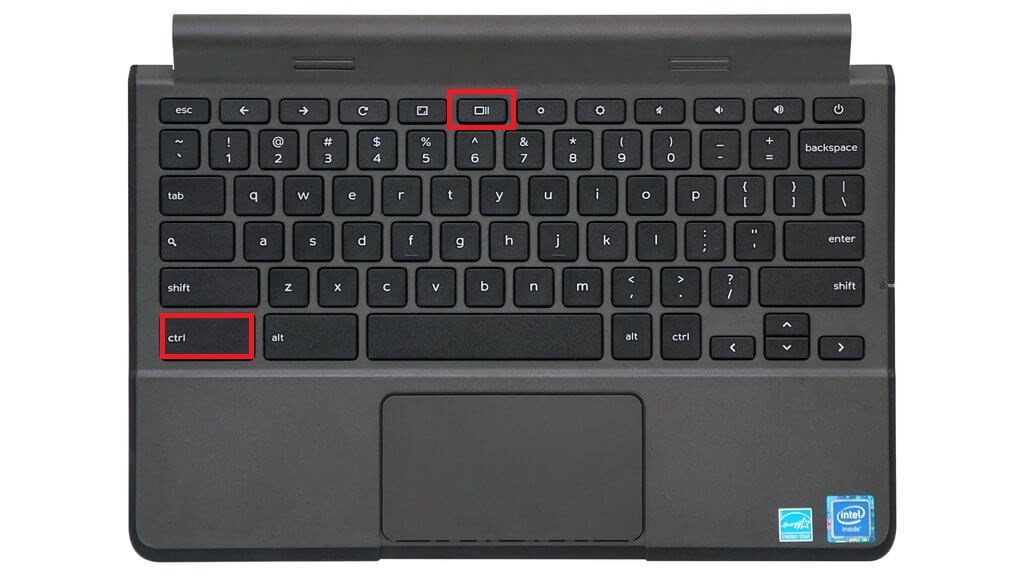
(1) Press and hold the Ctrl key and then press Switch window key (F5 key) to take a screenshot of whole window.
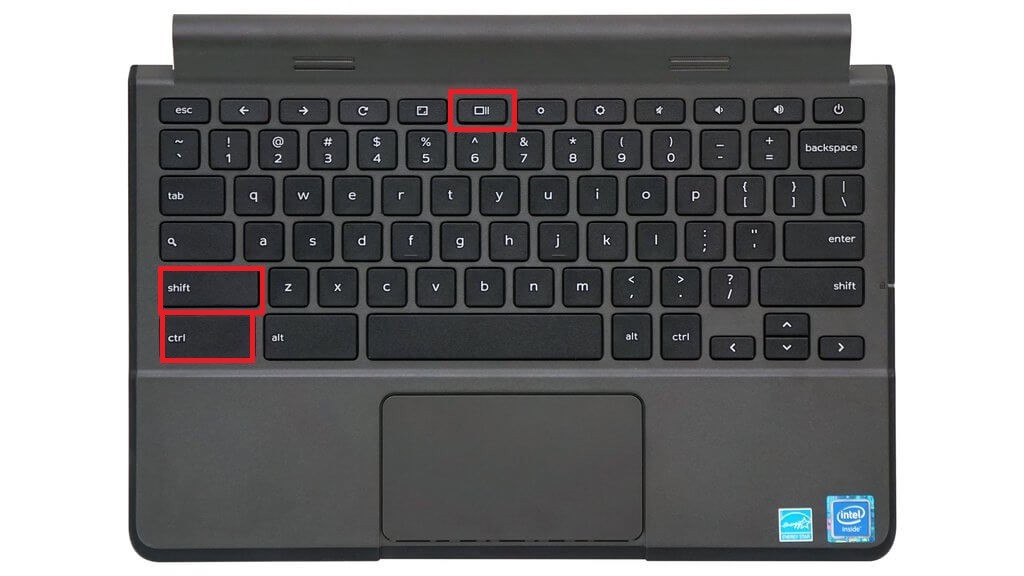
(2) To take a screenshot of selected portion of the screen,
- Press and hold Ctrl + Shift keys and then press the Switch Window key (F5 key). It will dim your Chromebook screen.
- Now your mouse cursor changes to a crosshair, by using the Crosshair select the portion of the screen you want to capture.
- Then tap the Chromebook touchpad or click the Mouse button to take a screenshot of the selected portion.
Once the screenshot is taken, it is saved as an image on the device Downloads folder.
Take a Screenshot on a Dell tablet
It you are owning a Dell Tablet, you can take screenshot using device buttons.
#1: Press and hold the Windows button and Volume down button simultaneously.
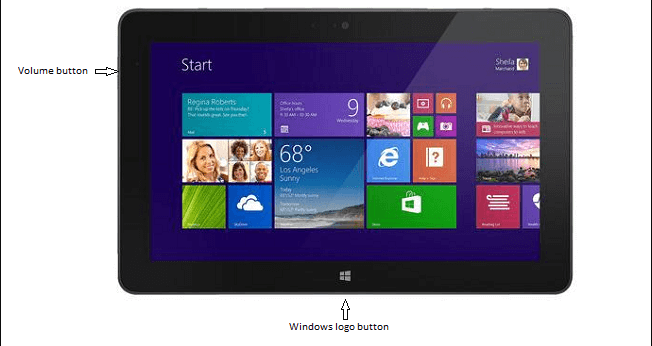
#2: Instantly the screen will flash and the screenshot will be taken and saved to the desired folder.
To Conclude
These are reliable and user convenient ways to take a screenshot on a Dell computer or laptop. The taken screenshots are saved to your device as an image, and so you can access it, edit and share the screenshot whenever you want.