Snipping Tool is a utility to capture your screen in real-time. It is primarily used on a Windows desktop PC or laptop to capture a particular area or screenshot entire screen. All the captured screenshots and snips are saved to your device folder in the desired image format. Moreover, you are allowed to perform some editing with various highlighters, colours, brushes and many editing tools. Snipping tool on Windows makes it easy to share a snip over social media apps. It is a default app on windos and you don’t have to download it seperately. Below guide will clearly explain you the different methods to open and use Snipping tool on Windows 10 device.
Contents
- Methods to Open Snipping Tool on Windows 10
- Method 1: Open Snipping Tool from Windows Start Menu
- Method 2: Open Snipping tool using Cortana Search
- Method 3: Open Snipping Tool using Run
- Method 4: Open Snipping Tool through Command Line
- Steps to Create Snipping Tool Shortcut on Windows
- How to Use Snipping tool on windows 10
- How to Take Delayed Screenshot using the Snipping tool
- Snipping Tool on Windows Keyboard Shortcuts
- To Conclude
Methods to Open Snipping Tool on Windows 10
There are different methods to open Snipping tool,
- From Windows Start Menu
- Through Cortana Search
- From Run
- Through Command line
Method 1: Open Snipping Tool from Windows Start Menu
#1: Click Start button on Windows home screen.
#2: Select Windows Accessories option to expand all apps.
#3: Under that, select Snipping tool to open it.
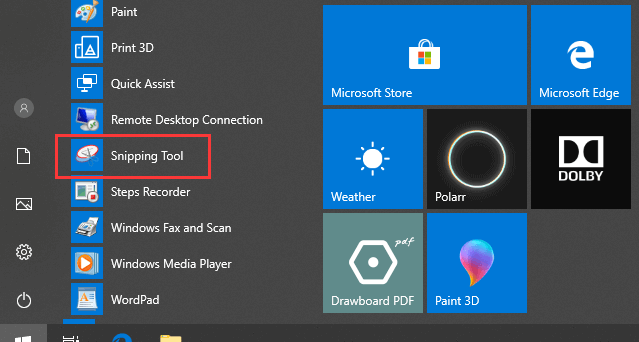
#4: If you want to Pin Snipping Tool to the taskbar for instant access, right-click on the app.
#5: Then click More option, followed by it select Pin to taskbar option.
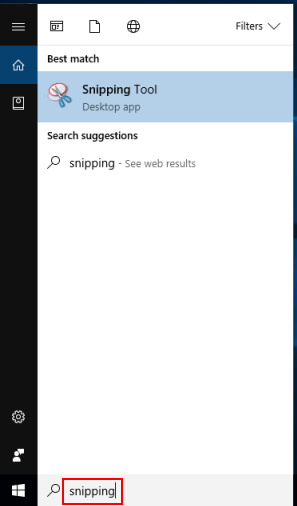
Method 2: Open Snipping tool using Cortana Search
#1: Go to the search box at the bottom next to start button and type Snipping tool, press enter.
#2: Click the Snipping Tool app from the search results to open it on your Windows.
Method 3: Open Snipping Tool using Run
#1: Launch the windows 10 device, press Windows + R keyboard keys simultaneously.
#2: As a result, a small Run window will appear on the screen, here type snippingtool in the text box.
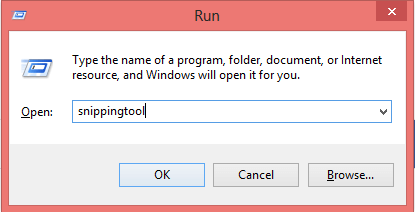
#3: Then click OK button to launch the Snipping tool on your Windows device.
Method 4: Open Snipping Tool through Command Line
#1: Open the Run Window (Windows Key + R) and type cmd in the text field, then click OK.
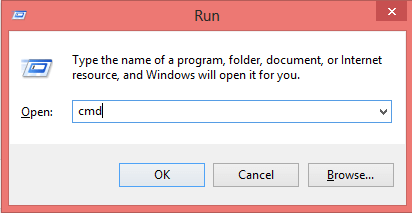
#2: Now the Windows command Prompt will appear on the screen, here type snippingtool.exe command line.
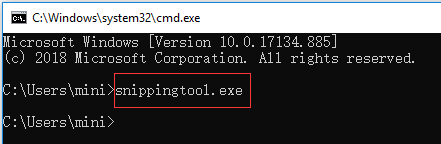
#3: Finally Press Enter to open the Snipping Tool on Windows device.
Tip! Best Screen Recorder for Windows
Steps to Create Snipping Tool Shortcut on Windows
If you are experiencing any issues or when you find it difficult to use a keyboard key or mouse to open the Shipping tool frequently, it is better to create a shortcut for the snipping tool.
#1: Right click on the Windows home screen and select New option.
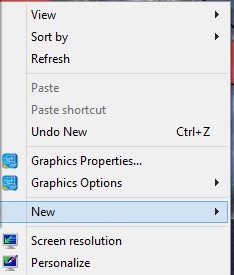
#2: Under New select Shortcut, the Create Shortcut screen will open.
#3: Now type snippingtool.exe in the appropriate text box and then click Next.
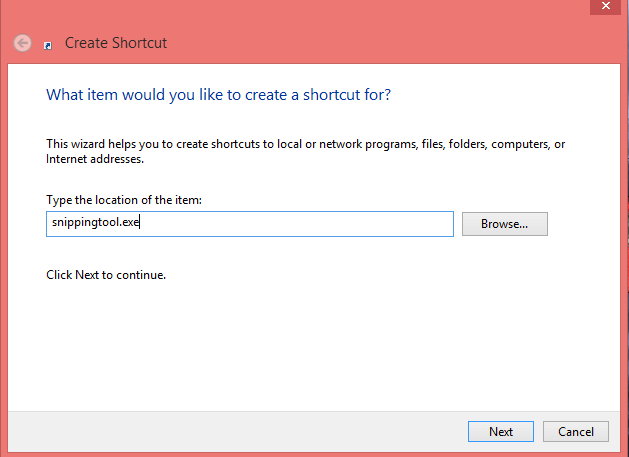
#4: Next enter the name for your shortcut file and click Finish to create Snipping tool shortcut.
How to Use Snipping tool on windows 10
#1: Open the Snipping tool on your windows 10 device.
#2: Click New option at the left of the window and choose the Snip type. There are four types of screenshots, Free-from Snip, Rectangular Snip, Window Snip and Full-screen snip.
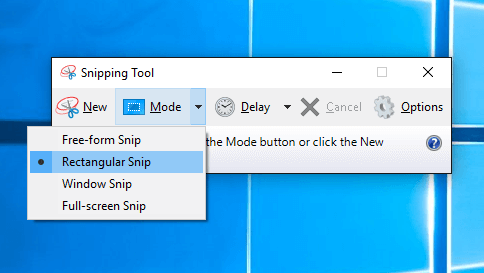
- Free-form Snip – Select the area with the mouse that you want to capture in any shape.
- Rectangular Snip – Select the screen area in the form of a rectangle shape.
- Window Snip – Select a particular window that you want to capture.
- Full-screen Snip – Capture the entire Windows screen.
#3: After selecting the screenshot area, click the save button to save the screenshot to your desired folder.
Note: Instead of Save, click the Copy button to copy the screenshot to the Clipboard.
How to Take Delayed Screenshot using the Snipping tool
#1: Open the snipping tool and click the Delay drop down option.
#2: Choose Delay Screenshot timing from 1-5 seconds.
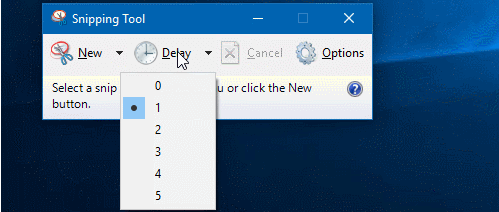
#3: Next click the New button to take the screenshot.

Snipping Tool on Windows Keyboard Shortcuts
Alt + M – Select Snipping mode and press enter.
Alt + N – Take screenshot in the same mode as last used.
Shift + Arrow keys – Select the area of your screen for rectangle snip.
Alt + D – Select Delay Capture.
Ctrl + S – Save the screenshot.
Ctrl + C – Copy screenshot to clipboard.
To Conclude
These are the ways to open and use the Snipping tool on Windows PC and laptop. You can edit the taken screenshot with Windows supported paint and photo viewer or editors apps. You can also use third-party screenshot capturing software like Lighshot if you are not comfortable using Snipping Tool. These methods work on all Windows Versions (8, 8.1, 7, Vista).
Comment below your feedback and queries. Follow techowns on Facebook and Twitter to catch our latest articles instantly.