Mac is a computer that runs on MaOS where you can perform all activities as it is compatible with several apps and services. Just like Android, Windows and other devices, you will be able to take screenshots on Mac devices. Taking a screenshot is necessary during a workflow as you can capture the device screen in real-time. You can take a screenshot of whatever is displayed on your Mac screen, it may be an image, video, browsing contents, app data and many more. Capture the interesting moments and share them with others and also keep it as a reference for you further doings. Mac offers several ways to take screenshots, then save, crop, edit, share and delete. Also, you can capture the different parts of your Mac screen just using a combination of keyboard keys. Let us see all those methods in detail here in this guide below.
Contents
Capture Entire Screen
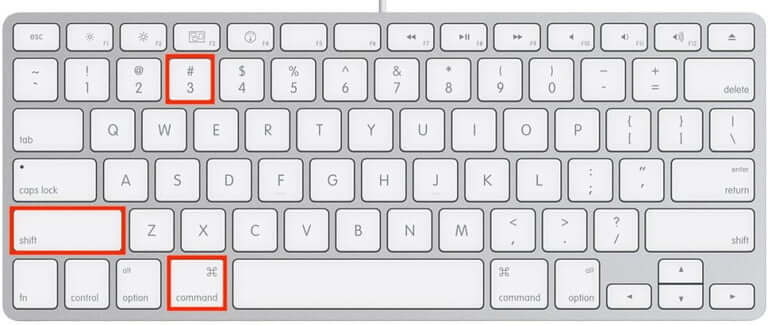
Capturing the Mac screen with keyboard keys seems to be simple and effortless.
#1: Press Command + Shift + 3 keyboard keys simultaneously to capture the entire Mac desktop screen.
#2: When you see the preview of your screenshot in the corner of the screen, click the image to edit.
#3: The captured screenshot is saved to the desktop in the .png image format along with the date and time.
Capture A Particular Portion of the Screen
#1: Press and hold the following keyboard keys, Shift + Command + 4.

#2: Now your mouse pointer changes to crosshair, click and drag the crosshair to select the area of the screen you want to capture.
#3: Release the mouse to take the screenshot. Your Mac device will save the screenshot in the .png image format.
#4: If you get the preview of your screenshot at the corner of your screen, click on it to edit the image.
Capture A Single Window or Menu
#1: To capture a window or menu, first open the window or menu that you want to screenshot.
#2: Then press the Mac keyboard shortcut keys, Shift + Command + 4 + Spacebar simultaneously.
#3: Click on the window or menu to take a screenshot, if you want to edit the screenshot click the preview at the corner of the screen.
#4: Finally the image will be saved to your Mac desktop.
Take a Screenshot using On-Screen Marquee
In case you are having a macOS Mojave or later, you have to use the following keyboard combinations.
#1: Press Command + Shift + 5 at the same time.
#2: Select the portion that you want to capture and then save the image in the desired location.
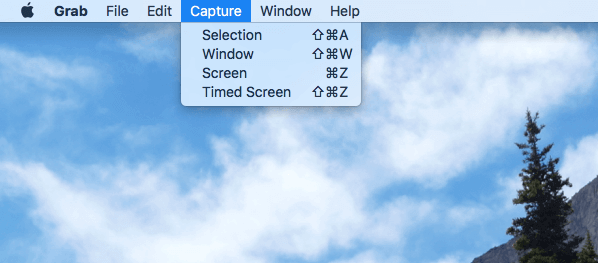
Take a Screenshot with Grab
Grab is a screenshot app which is supported on all Mac devices.
#1:Open the Finder and choose Applications option at the left.
#2: Now double click on the Utilities folder.
#3: Under utilities folder, select Grab app.
#4: Now select the capture menu button and choose your desired screenshot option or use the below keyboard shortcuts to take a screenshot.
- Selection – Shift + Command + A
- Window – Shift + Command + W
- Screen – Command + Z
- Timed screen – Shift + Command + Z
Note: If you are using macOS Catalina, you will not find the Grab app. Alternatively, you can use the keyboard combinations to get Grab, Command + Shift + 5.
How to capture Touch bar?
If you want to take a screenshot of the touch bar, it can be done using keyboard key combinations.
Press and hold the Command + Shift + 6, your Mac device will capture the Touch bar and save the screenshot.
How to Copy the Screenshot to the Clipboard?
If you want to copy the captured screenshot, instead of saving it to the desktop folder, you have to press the Control key along with the appropriate keyboard combinations.
For Example: Command + Shift + 3 + Control Key to copy the image to the clipboard.
Take a Screenshot Without Keyboard Shortcuts
If you are getting confused with keyboard shortcuts, you can use Preview to take a screenshot on Mac. Preview is a converting tool that allows you to convert photos to PDF files and also features the ability to take screenshots.
#1: Open the Finder and select Applications option at the left side.
#2: Navigate to Preview option and double click on it to open.
#3: Next click the File menu option at the top of screen. It will open the drop down with list of options.
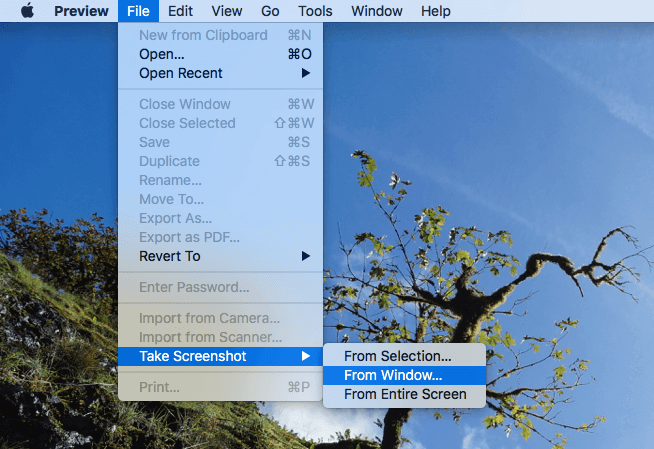
#4: Select Take Screenshot option at the bottom and then choose the desired option.
To Conclude
These are the simple and easy ways to take a screenshot on macOS. All the captured screenshots are stored in the desktop folder as an image and you don’t have to find it anywhere else. You can easily change the file format, crop, edit and share using Airdrop or email with others without any limitations. Hope the above-mentioned methods are clear to capture a screenshot, and if you have any queries, leave it in the comments below. We are also available on Facebook and Twitter.