Nintendo Switch is a popular gaming console that helps you to enjoy HD gaming on your TV. It provides tons of games and also offer parents a lot of control over their kid’s gaming habit. Parental control is a powerful tool that helps you to keep your kids safe. Nintendo switch parental control app helps parents to monitor kid’s activities, limit play-time, set bedtime alarms, age restrictions, and more. It also allows you to control how kids get to interact with others both in-game and social media. The app also delivers a push notification each time when your kids download new games. Nintendo Switch parental control app is free to download and available on both Android and Apple devices. Parental controls will be helpful when you are using streaming apps like Hulu on your Nintendo Console.
Contents
- How to Set Parental Control PIN on Nintendo Switch
- How to Change Parental Control Settings on Nintendo Switch
- How to Register Nintendo Switch to Parental Control App
- How to Set Control Using Parental Control App
- How to Remove Nintendo Switch Parental Control
- How to Unregister Parental Controls app
- How to Turn on eShop Password Restriction
How to Set Parental Control PIN on Nintendo Switch
[1] Turn on your Nintendo switch and go to the home screen.
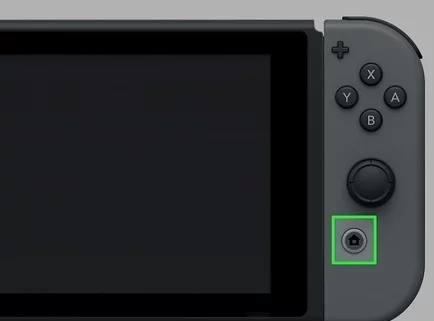
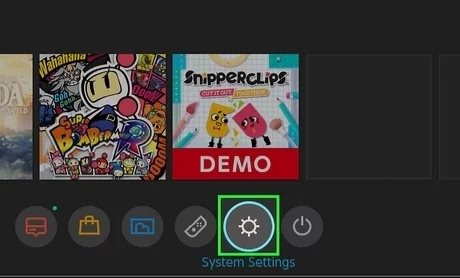
[2] Select System Settings (gear icon).
[3] Scroll down to Parental Controls and click Parental Control Settings.
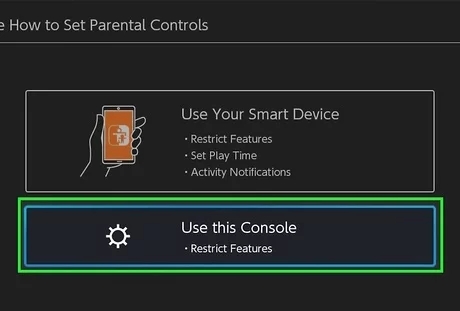
[4] Click Use this console and click Next.
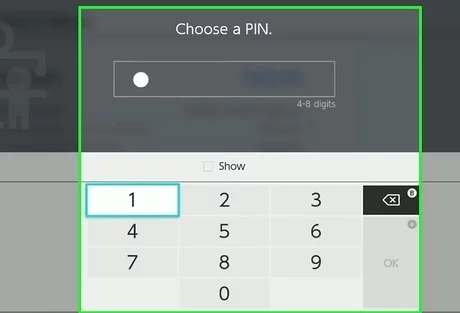
[5] Now choose a PIN and repeat it again to confirm it.
[6] You can also change the PIN at any time. Go back to Parental control > System Settings and select Change PIN.
How to Change Parental Control Settings on Nintendo Switch
[1] Go to the home screen and click the System Settings menu.
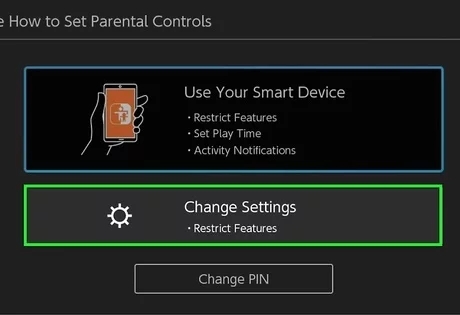
[2] Select Parental Controls and click Parental Control Settings.
[3] Select Change Settings.
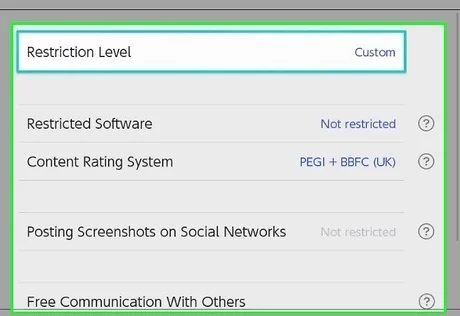
[4] Click Restriction Level. It has five restriction level settings:
- Non-Restricted – Turn off parental controls.
- Teen – Restrict games for users older than 17 years.
- Pre-Teen – Restrict software for users older than 13 years.
- Child – Restrict software for users older than 8 years.
- Customs – It has more options:
- Restriction Level – It allows to set restrictions for Teen, Pre-Teen, and Children.
- Restricted Software – It allows to select specific age and restrict games rated for that age.
- Software Rating Organization – It allows you to select software rating organizations.
- Posting Screenshots on Social Media – It allows you to restrict posting videos to linked social media
- Free Communication With Others – It allows you to restrict the ability to use voice chat.
[5] Choose your restriction level and click Next.
[6] Now, enter the PIN and enable the chosen restrictions.
Check out our guide on the best games for Nintendo Switch to get the best gaming experience.
How to Register Nintendo Switch to Parental Control App
[1] Launch Nintendo Switch Parental Controls on your smartphone.
- Android – Google Play Store
- iPhone – App Store
[2] Open Nintendo Switch Parental Controls app.
[3] Click Next at the lower right corner of the app screen.
[4] Select the Sign In/Create Account button.
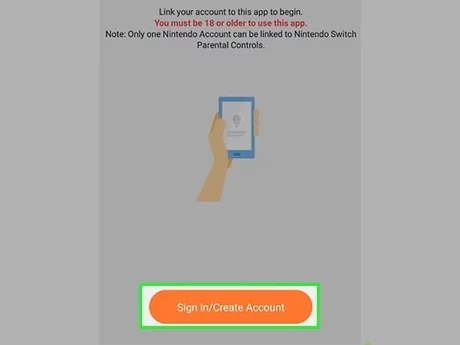
[5] On the next screen, click Sign in if you have a Nintendo account already. Click Create a Nintendo Account if you don’t have a Nintendo account.
[6] Click Select this person.
[7] You need to link your Nintendo account to the Nintendo Switch. Place your Nintendo Switch next to the smartphone and click Next on a smartphone app.
[8] Now, the smartphone screen will display a registration code.
[9] Power on the Nintendo Switch and go to the home screen.
[10] Select the System settings icon.
[11] Click Parental controls and select Parental Control Settings.
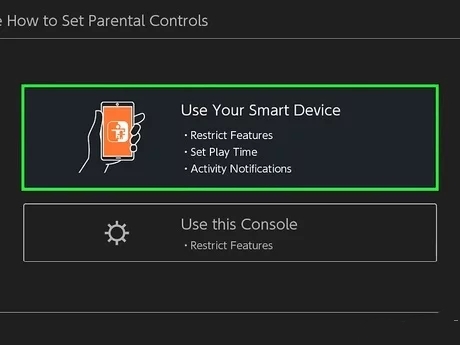
[12] Select Change settings and tap Use Your Smart Device.
[13] The pop-up screen asks whether you have Nintendo Switch. Click Yes.
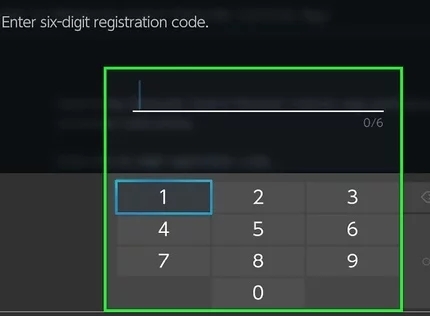
[14] Click Next and tap Enter Registration Code.
[15] Type the registration code that appears on your smartphone and click the OK button.
[16] Click Register and select Continue Setup on smart device.
[17] Finally, you have paired your Nintendo Switch with the smartphone app.
[18] Now, you can set parental control using your smartphone.
How to Set Control Using Parental Control App
[1] Launch the Nintendo Switch Parental Controls app on your smartphone.
[2] Click Time Played at the top and click Monthly Summary.
[3] Click Console Settings and tap Play-Time Limit.
[4] Set play-time limit.
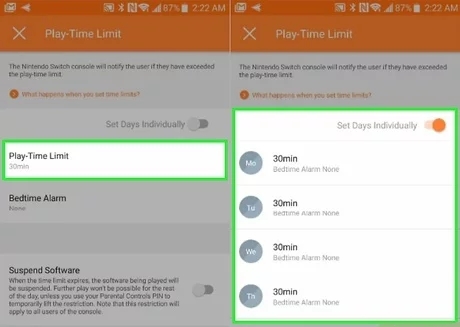
[5] Set Bedtime alarm time under the Bedtime Alarm option.
[6] Enable the Suspend Software toggle and tap the Checkmark icon.
[7] Click Restriction Level.
[8] Choose the desired restriction level and click the Checkmark icon.
[9] Select PIN and enter a new PIN.
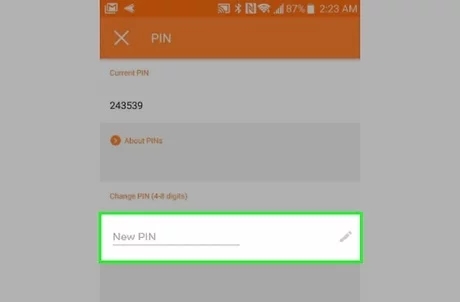
[10] Once you type a new PIN, click the Checkmark icon.
[11] The changes will be updated on your console.
With this, you can check the total game time on the Nintendo Switch console.
How to Remove Nintendo Switch Parental Control
[1] On your console, click System Settings > Parental Controls > Change Settings.
[2] Type your PIN.
[3] Tap the X button to remove all parental control settings.
How to Unregister Parental Controls app
[1] Open System Settings on your Nintendo Switch home screen.
[2] Scroll down and click Parental Controls.
[3] Select Unregister App and enter the PIN when prompted.
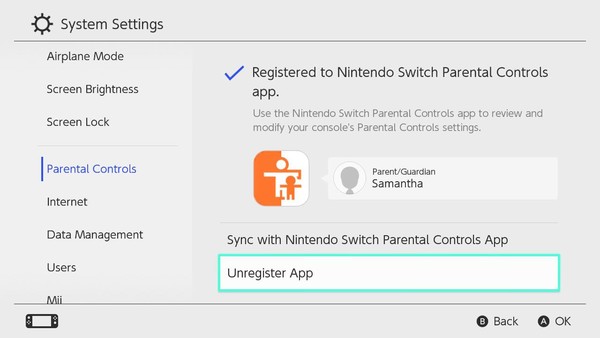
[4] Finally, select Unregister to disconnect the smartphone app from the console.
How to Turn on eShop Password Restriction
With this feature enabled, you have to enter the password every time you make a purchase. This will protect your kid from making unwanted game purchases on the console.
[1] Open System Settings on your Nintendo Switch.
[2] Select Users.
[3] Choose the account for which you want to turn on password restriction in the eShop.
[4] Then, choose Nintendo eShop Settings.
[5] Next, scroll down to Password-Entry Settings and choose Change.
[6] Click Enter and save all the changes.
These are things that you have to consider when using the Nintendo Switch Parental Controls app. Customize these settings in your desired way and limit your kid’s gaming time. If you have any misunderstandings with any one of these features, let us know in the comments.
Follow our Facebook and Twitter pages to get new updates.