Bose has been serving users for the past five decades with a steady reputation. The headphones from this brand are popular for their excellent features, noise cancellation, and irreplaceable comfort. If your iPhone has a traditional headphone jack, you can connect Bose headphones to it. Since recent iPhone models don’t have a headphone jack, you can’t connect it directly. Therefore, you need to make use of Bluetooth to establish a connection between the headphone and the iPhone. You need to have the Bose Connect app on your iPhone to make this work.
Note – The following guide applies to all iPhone models, including iPhone X, iPhone 11, iPhone 12, and iPhone 13. iPad users can also follow the same steps to connect Bose Headphones with their device.
Contents
How to Connect Bose Headphones to iPhone
In the following section, you can find out how to connect headphones to iPhone.
How to Connect Bose Headphones to iPhone With Bose Connect
Follow these instructions to connect your headset to your iPhone with Bose Connect.
1. Initially, make sure that you have enabled Bluetooth on your iPhone.
2. On the Bose headphone, turn the switch on the right earpiece to green from red.
3. Install the Bose Connect app on your iPhone from the App Store.

4. The app will detect your headphone automatically.
5. You can see a message on your screen asking you to Drag and Connect.
6. Swipe down on the screen to connect the headphone to your iPhone.
7. The app will connect to your headphone with a message, “Connecting.”
8. Press the Ready To Play button from the bottom of the app screen.
9. Finally, you can use the headphone on your iPhone.
How to Connect Bose Headphones to iPhone Using Settings
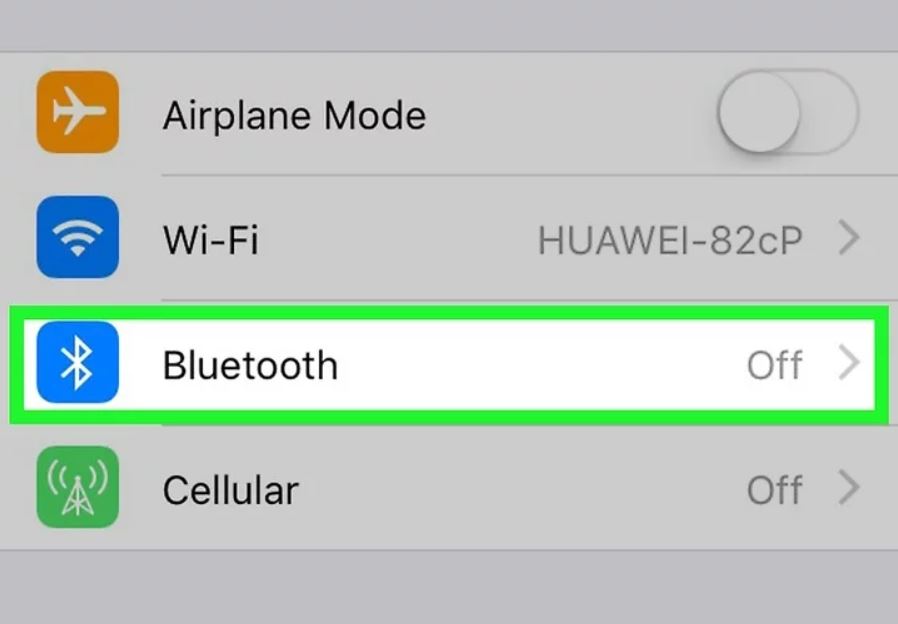
1. On your iPhone, open the Settings and select the Bluetooth option.
2. On your Bose headphone, turn on the switch on the right earpiece from green to red.
3. From the Other Devices section, tap the Bose headphones.
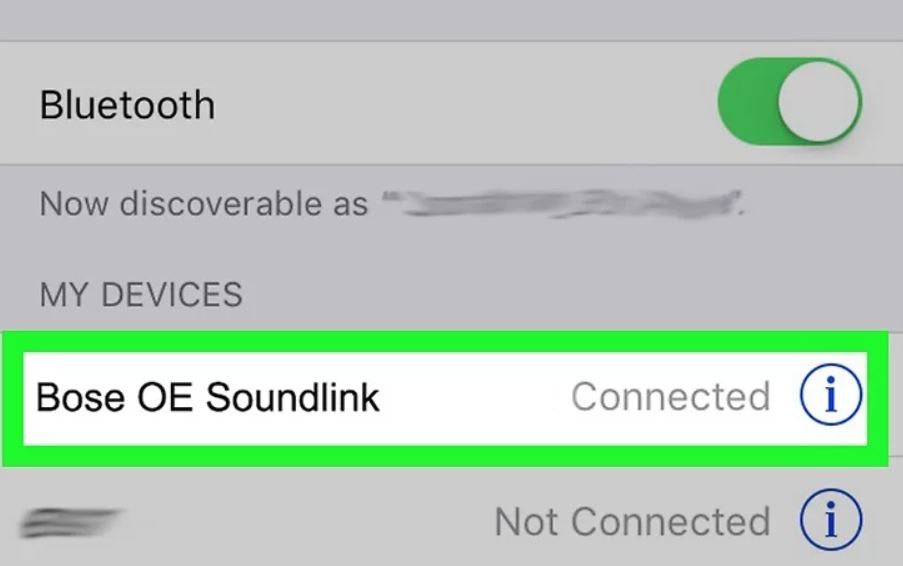
4. When connected, you can find the headphone listed under the My Devices field with a Connected status.
5. With that, you have connected your headphone to your iPhone.
How to Disconnect Bose Headphones From iPhone
Disconnecting your Bose headphone is a simple process. You can un-pair your Bose headphones from your iPhone as follows.
1. To turn off your headphone, you can simply turn off the switch on the right earpiece from green to red.
2. Open Bose Connect app and tap the image of headphones.
3. Finally, tap the Disconnect option.
4. You can also disconnect it by disabling the iPhone Bluetooth.
5. To remove the headphone from your iPhone from Settings > Bluetooth > tap the i symbol near the headphone > Forget This Device.
Can’t Connect Bose Headphones to iPhone: Fixes
Try these troubleshooting tips if you can’t connect your Bose headphones to the iPhone.
1. The Bose Connect app should know your location to connect properly. For this, open the Settings menu > Apps > Bose Connect > Permissions > Allow location access.
2. Also, clear the app cache on your iPhone for Bose Connect app from the Settings menu > General > iPhone Storage > select Bose Connect > Offload app.
3. Make sure that your headphones are not fake so that the Bose Connect app can detect them.
4. Make sure that you have updated the iPhone software. If there are unfixed bugs on your device, the headphones won’t connect.
5. If you can’t connect the headphone using Bose Connect, you can connect using the Settings menu.
Frequently Asked Questions
Check if you have enabled the Wi-Fi on your iPhone and turned on the switch on the right earphone piece.
To pair the Bose wireless headphones, get the Bose Connect app. Open the app, choose your headphone, and swipe down the screen to connect to the headphone.