With Xbox One, Microsoft let its users experience the best of gaming and entertainment. Xbox One will take your gaming skills to a whole new level. You will be able to play like a pro with a wide range of digital games it has. Without the Xbox One Controller, you will not be able to get to know the real fun of playing Xbox One games. The controller is the most essential thing to control the gameplay. Xbox One controller holds a sync button, two analog triggers, analog sticks, ten digital buttons, and a digital D-Pad. Besides this, there is a guide button with which you will be able to turn on the console or the controller. For any reason, if you consider disassembling the Xbox One controller, then we will guide you step-by-step. Take a look at how to take apart the Xbox One controller in brief.
FYI! For any reason, Microsoft doesn’t recommend you open the Xbox One gaming controller. It recommends you to look for professional help in order to deal with internal repairs. Be cautious as damaging the parts may void the warranty.
How to Take Apart Xbox One Controller?
You may have to follow the steps given below to take the Xbox One controller apart.
Things you Need in Prior:
- A plastic pry device
- Magnetic parts tray
- Precision screwdriver with TR8 bit
Make sure to take out the batteries of the controller before starting the process.
(1). Place the controller on the magnetic parts tray to prevent the parts by falling on the floor and getting lost.
(2). From the tool kit, you should take the orange pry tool to remove the handle covers of the controller.
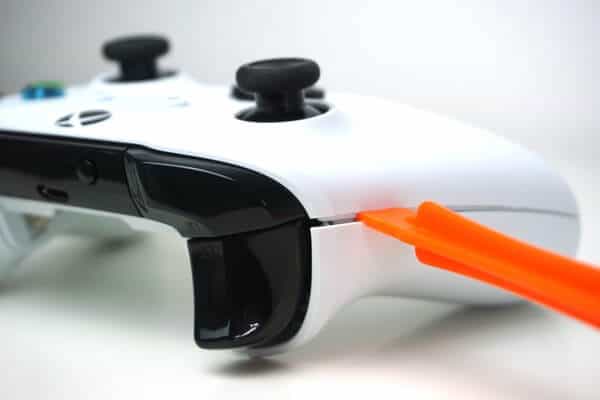
(3). You should slide the pry tool between the plastic seam on the grips.
(4). Now, lever the grip away from the body of the main controller.
Note: There will be an adhesive holding under the plastic. So, you need to apply a little bit of your force. Make sure you aren’t damaging the internal parts.
(5). Do the same for both the grips.
(6). Use the TR8 bit screwdriver to unscrew the screws and place them on the magnetic tray.
(7). Now the Xbox One controller will be apart. Just pull it apart firmly without damaging the cable that connects the battery to the controller.
(8). Unscrew the security screws with the help of the T8 screwdriver from the kit. Make sure you also unscrew the screw that is behind the sticker in the battery housing.
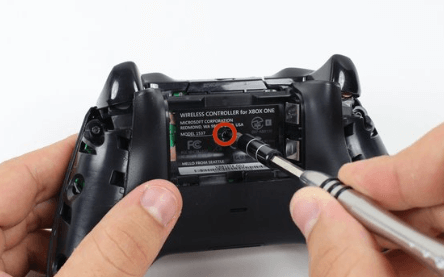
(9). With this, you will be able to find that the controller has three parts. A front faceplate, the middle body with circuitry, and the battery housing.
Our Opinion
Taking the Xbox One controller apart is easy and simple. But you should be very careful and handle it with utmost care. This way, you can disassemble the controller to clean the interior, fix the stuck joystick or the d-pad, fix controller drift issue, paint it if you want, replace bummers or simply repair it.
Have you been able to disassemble your controller with our guidelines? Share your opinions in the comments. For more interesting articles, you shall keep tabs open on our Facebook or Twitter pages. Do follow our Facebook and Twitter accounts for more related tech updates.