Key Highlights
- To Take Screenshot on iPad: Press the Top button + Home/ Volume button → Get the screenshot→ Preview at the bottom left of the screen.
- Apple Pencil: Swipe the Apple pencil from the left bottom to upwards → Edit the work → Click Done → Click Share to share a screenshot.
- Assistive Touch: Enable Assistive Touch → Click Assistive Touch → Tap Screenshot.
- Back Tap: Turn on Back Tap → Double-tap the Apple logo to take a screenshot.
A screenshot lets you take a picture of your iPad screen in a single click. It helps for your reference, and you can also share it with someone. This feature is supported on all iPads running iPadOS 13 to iPadOS 17. Once you take a screenshot, it will be automatically saved to the Photos app.
In this article, you will learn about the various methods to take screenshots on your iPad.
Contents
- How to Take a Screenshot on iPad Pro, iPad Air, and iPad Mini
- How to Capture Screenshots on iPad With Home button
- How to Take a Screenshot on iPad Without Home Button
- How to Take a Screenshot on iPad Using Apple Pencil
- Apple Pencil Compatible iPad Models
- How to Take Screenshots on iPad Using Assistive Touch
- How to Take Screenshots on iPad Using Back Tap
- How to Take a Full-Page Screenshot on iPad
- How to Take Screenshots on iPad Using Third-Party Apps
- FAQ
How to Take a Screenshot on iPad Pro, iPad Air, and iPad Mini
Based on your model, you can take screenshots on the iPad in five ways.
- Using Home button
- Using Volume button
- Using Apple Pencil
- Using Assistive Touch
- Using the third-party apps
This method of taking screenshots applies from iPadOS 17 to iPadOS 13 models. If you use an older version, update your iPad and follow the steps.
1. Go to the desired page on your iPad that you want to take a screenshot. Press the Top and Home buttons simultaneously, as shown in the image.
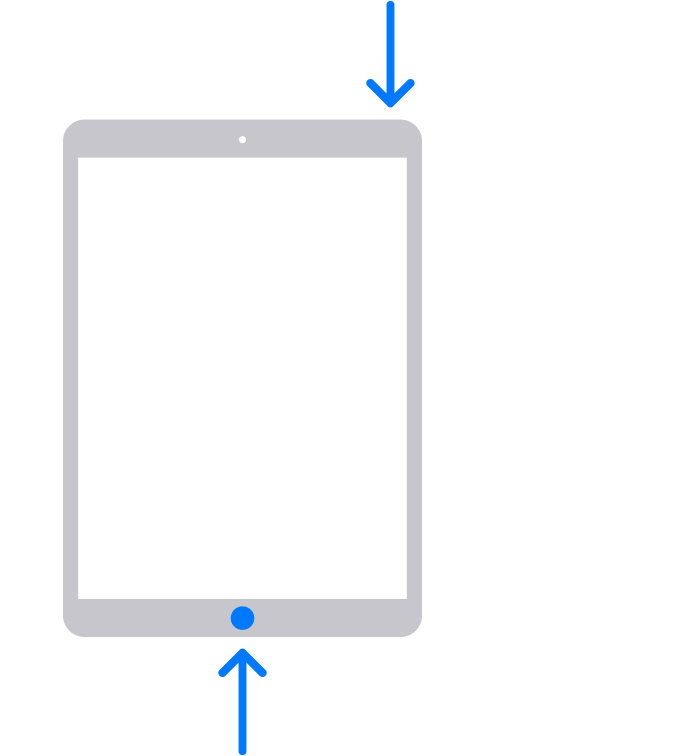
2. You need to release both buttons at a time quickly. Screenshots will be captured on the desired picture.
3. The thumbnail of your screenshots will be displayed at the lower left corner of the screen. Hit the thumbnail to open the picture.
4. Also, share the captured screenshots with your friends with the below steps.
- Photos app→ Screenshots→ Select the Screenshots→ Share icon→ Choose the method of sharing→ Done.
How to Take a Screenshot on iPad Without Home Button
Here are the steps to take a screenshot on iPad Air 4 and 5, where the Home button is unavailable.
1. Choose the preferred picture on your iPad to take screenshots. Press the Top and Volume buttons at the same time.
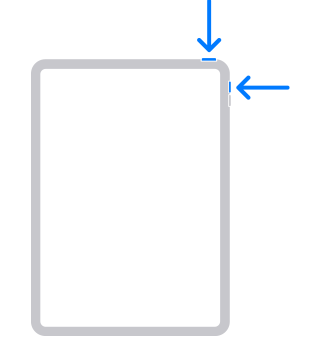
2. You can release both buttons rapidly. Screenshots will be captured from the picture.
3. Preview the thumbnail of your screenshots at the lower left corner of the screen. You can even view the screenshots on the Photos app from the screenshots section.
Note: If you have an iPhone 14 or higher, press the side and Volume Up buttons simultaneously to take a screenshot on an iPhone.
How to Take a Screenshot on iPad Using Apple Pencil
1. You need to swipe your Apple pencil from the left bottom to upwards towards the center of the screen. You will get the editing and annotation screen.
2. After finishing the editing work of your screenshots, hit the Done option placed in the left corner to save the image.

3. Click the Share button at the top right corner of the screen to share the screenshot with your friends.
Note: If you wish to edit a screenshot at the core level, check our guide on the Photo editing apps for iPad.
Apple Pencil Compatible iPad Models
Ensure you know the compatibility of Apple Pencil before using it to take a screenshot on an iPad.
- Apple Pencil (2nd generation)
- iPad mini (6th generation)
- iPad Air (4th generation and later)
- iPad Pro 12.9-inch (3rd generation and later)
- iPad Pro 11-inch (1st generation and later)
- Apple Pencil (1st generation)
- iPad mini (5th generation)
- iPad (6th, 7th, 8th and 9th generation)
- iPad (10th generation)
- iPad Air (3rd generation)
- iPad Pro 12.9-inch (1st and 2nd generation)
- iPad Pro 10.5-inch
- iPad Pro 9.7-inch
Note: Those with an iPad (10th generation) can use a USB-C to Apple Pencil Adapter.
How to Take Screenshots on iPad Using Assistive Touch
In this method, you need to enable Assistive Touch on your iPad. Go to Settings → Accessibility → Touch → Assistive Touch → Turn on the toggle to enable the Assistive Touch.
Now, open the app or go to the screen you wish to capture. Click Assistive Touch and tap Screenshot to capture the screen.
How to Take Screenshots on iPad Using Back Tap
To enable Back Tap on iPad, Go to Settings → Accessibility → Touch → Back Tap. On the same page, click Double Tap and select the Screenshots option.
1. Go to the screen you want to capture on an iPad.
2. Double-tap the Apple logo on your iPad’s backside to take a screenshot.
How to Take a Full-Page Screenshot on iPad
If a particular content exceeds the length of an iPad screen, you can use the Full Page option.
1. Press the Top and Volume buttons at a time.
Note: Press the Top and Home buttons simultaneously if you have an iPad with a Home button.
2. Click the screenshot thumbnail at the screen’s bottom left corner.
3. Click Full Page and tap Done. Choose any one of the following.
- Select Save to Photos to save the screenshot in the Photos app.
- To save PDF on an iPad, click Save PDF to Files, choose a location, and click Save. It will be stored in the Files app.
How to Take Screenshots on iPad Using Third-Party Apps
You can screenshot only your iPad screen in all the above-mentioned methods. On Android devices, you can take a long screenshot. This feature is not available on iPasOS devices. For this purpose, you need to install third-party apps.
You can use the apps like Screenshot PRO and CloudApp to take long screenshots. You need to upload the subsequent screenshots. These apps will automatically merge photos without any lagging.
| Apps | Download Link | Compatibility |
|---|---|---|
| Screenshot PRO Screenshots App | App Store | iPadOS 14.0 or later |
| CloudApp – Screen Capture | App Store | iPadOS 12.0 or later |
FAQ
Yes. Press the Magic keyboard shortcut Command+Shift+3 to take a screenshot on an iPad. To take a screenshot and edit it, press Command+Shift+4.
Press the Sleep/Wake and Home buttons at a time and release them to capture the screen.