Chromecast is a popular console used to cast all types of media contents from smaller screens of mobiles, tablets, and PC to bigger screen TVs. While setting up the device, you can configure a WiFi connection on Chromecast to connect to it automatically whenever the device is powered on. However, in some cases, you may face a situation of connecting your Chromecast to a new WiFi connection. Here are some of the reasons to change or switch WiFi network on Chromecast
- changing your router
- moving your Chromecast to a new location on the house where you have a new WiFi setup
Whatever the reason may be, it is very simple to switch networks on Chromecast. Since Chromecast can’t remember two WiFi networks at a time, you need to reset your Chromecast to change the networks.
How to Connect your Chromecast to a new WiFi network?
In order to change or switch the WiFi network on Chromecast, you need the help of the Google Home app which you can download from the Play Store and App Store.
Step 1: Connect your Chromecast to the TV and make sure that the Google Home app installed on your device (Android/iPhone/iPad) and connected to the same WiFi network as that of Chromecast.
Step 2: Launch the Google Home app and select your Chromecast device.
Step 3: Now, click the Settings icon located at the top right corner of the screen.
Step 4: Scroll down to menu and select the WiFi section.
Step 5: A new pop-up will appear on the screen. Select Forget Network.
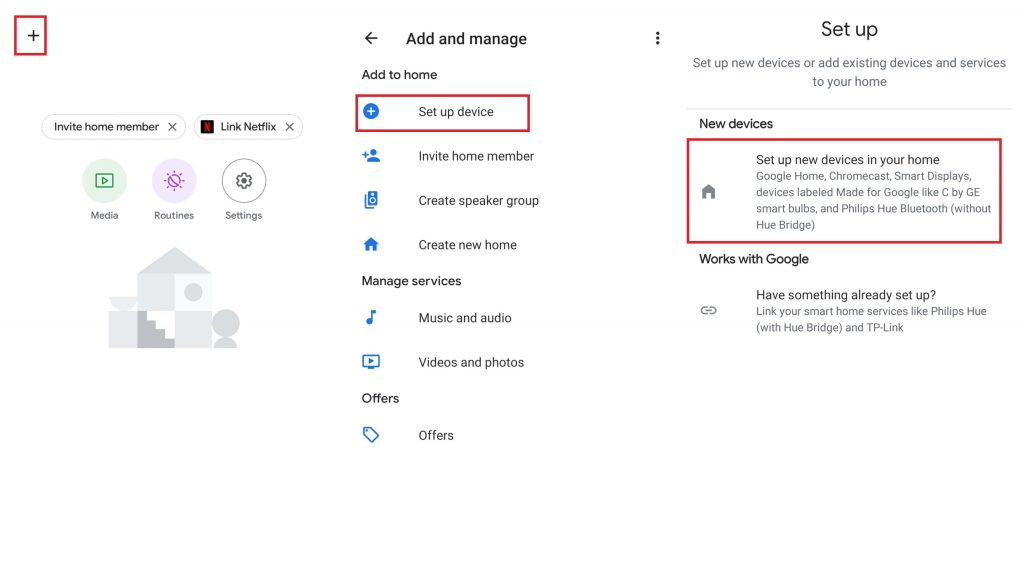
Step 6: Now, tap the + icon on the top right corner of the screen.

Step 7: Select Set up device.
Step 8: Select Set up new devices in your home.
Step 9: Select your profile and click Next.
Step 10: Wait for Google Home app to detect your Chromecast.
Step 11: Once detected, tap Yes.
Step 12: A alphanumeric code will appear on both Google Home app and Chromecast connected TV.
Step 13: Tap Yes if the code matches with each other.

Step 14: On the next screen, tap Yes, I’m in if you want to share device stats with Google. Or click No thanks.
Step 15: Select your new WiFi network and click Next.

Step 16: If you want Chromecast to take a password automatically from the device, tap OK.
Tap Enter manually, if you want to enter the WiFi password manually.
Step 17: If you have selected the manual option, enter the password on the next screen, and click Connect.
Step 18: Wait for a few seconds as Chromecast connects with a new WiFi network. Once connected, you will receive Connected confirmation on the screen.
Step 19: On the consecutive screens, go through the onscreen prompts to complete the process.
Step 20: Your Chromecast will be connected to a new WiFi network and you can start casting media contents to Chromecast.
To conclude
It is straightforward to change the WiFi Network on Chromecast as long as the previous WiFi network connected to the Chromecast is still active. However, things might get complicated when the old network is not active or when you have purchased a new router. In that case, you must hard reset the device and go through the setup Chromecast process from scratch.
Do you have any problems while changing the Chromecast WiFi network? Please let us know in the comments sections. If you’re interested in reading more tutorials related to Chromecast, follow our Twitter and Facebook profiles.