Linux is the best operating system, and it has widespread branches called distributions. Arch Linux is one of its distributions that is more popular among hardcore Linux users. It is a general-purpose rolling release Linux distribution that is lightweight and flexible enough to use. Arch Linux lets you update cutting edge software and packages when the developer releases them. Arch Linux is a great option to install if you are an intermediate Linux user or looking to replace your device’s current operating system. While the steps involved in installing Arch Linux are a bit complicated, we thought of guiding you better.
Contents
- How to Install Arch Linux
- Steps to Boot the Installer
- 1. Backup your PC
- 2. Download Arch Linux ISO
- 3. Burn the ISO Image onto DVD
- 4. Restart PC
- 5. Change Boot Order
- 6. Choose Installation Drive as Primary Boot Drive
- 7. Choose to Save & Exit
- 8. Select Boot Arch Linux
- Steps to Create Partitions
- 1. Check your Existing Hard Drives
- 2. Create a Swap Partition
- 3. Create a Main Hard Drive Partition
- 4. Lable Swap Partition
- 5. Note Partition Names
- 6. Select Quit
- 7. Format Primary Partition
- 8. Mount Formatted Partition
- 9. Add Swap File to Swap Partition
- Steps to Install Arch Linux
- 1. Set up a WiFi connection
- 2. Install Base System
- 3. Open chroot Access
- 4. Set a Password
- 5. Set a Language
- 6. Select a Time Zone
- 7. Set Host Name for PC
- 8. Download GRUB Bootloader
- 9. Install GRUB
- 10. Create an init file
- 11. Create Configuration for GRUB
- 12. Create fstab File
- 13. Reboot Computer & Login to Account
- To Conclude
How to Install Arch Linux
The following procedure will let you install Arch Linux.
Preliminary requirements:
- x86-64 compatible machine
- PC or VM with 512 MB of RAM
- 2 GB of free space
- USB drive with 2 GB of space
- Software to burn DVD
- Active internet connection
Steps to Boot the Installer
1. Backup your PC
Before you proceed, we shall back up your PC to the external hard drive. It is an essential thing as it installing Arch Linux involves erasing your current operating system.
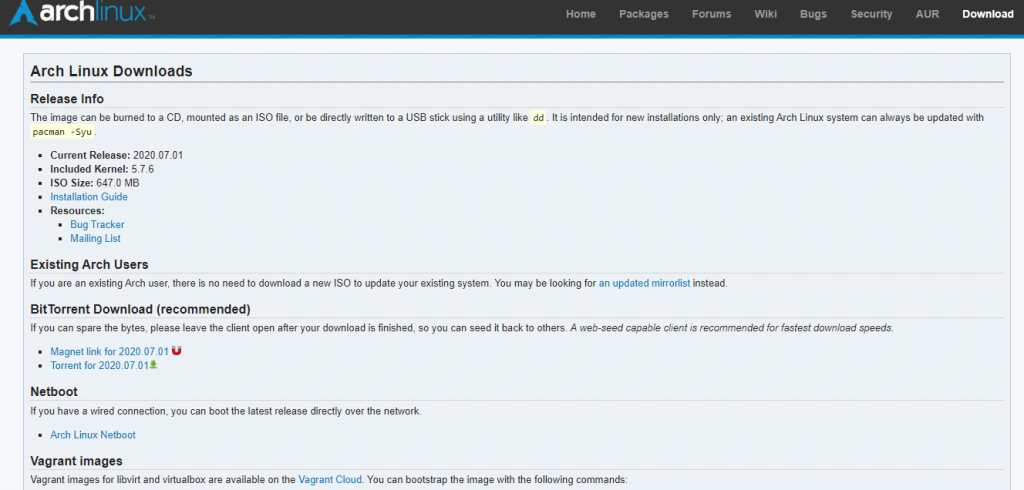
2. Download Arch Linux ISO
- Visit archlinux.org/download on your PC browser.
- Click on the Torrent link.
- Use the torrent clients like uTorrent or BitTorrent to download the file.
- Proceed with the next step if Arch Linux has completed its download.
Techowns Tips – Steps to install Kali Linux
3. Burn the ISO Image onto DVD
Connect a blank DVD drive on your PC to burn the Arch Linux ISO file onto it. You can use different software like AnyBurn, Brasero, etc., to burn the ISO image onto the DVD.
Note: Skip this step if you are about to install Arch Linux on Virtual Machines.
4. Restart PC
Based on the desktop operating system, you shall use the respective keys to restart your PC.
Note: On Mac, select Apple menu > System Preferences > Startup > External Drive > Restart.
5. Change Boot Order
Press F12 on the newer model computers. If you don’t find it, press the BIOS setup key, usually F1, F2, F10, or Del.
Note: Mac users can just skip this step.
6. Choose Installation Drive as Primary Boot Drive
Select the DVD or Disk Drive that has Arch Linux and press the + key to set it as the primary drive. On some devices, you shall open the Advanced tab or choose Boot Options.
Note: Skip this step if you are using Mac PC.
7. Choose to Save & Exit
Look at the bottom right corner of the screen to click on Save & Exit setup. With this, your device will resume restarting.
Note: Skip this step if you are using Mac PC.
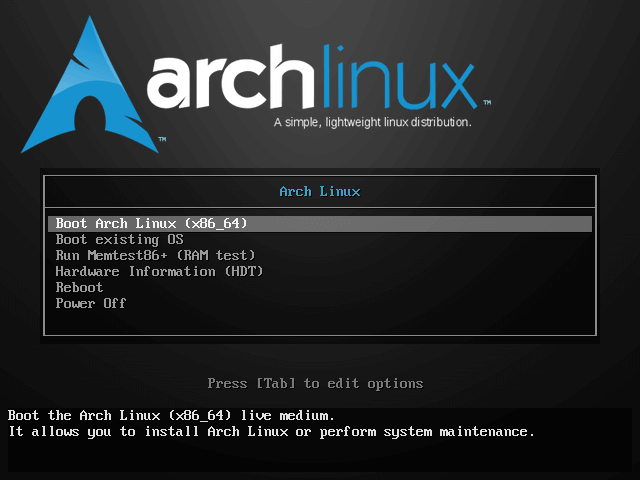
8. Select Boot Arch Linux
Upon selecting Boot Arch Linux, you can press the Enter key. With this, the Arch Linux installer will launch, and you need to proceed with the partition of your hard drive.
Steps to Create Partitions
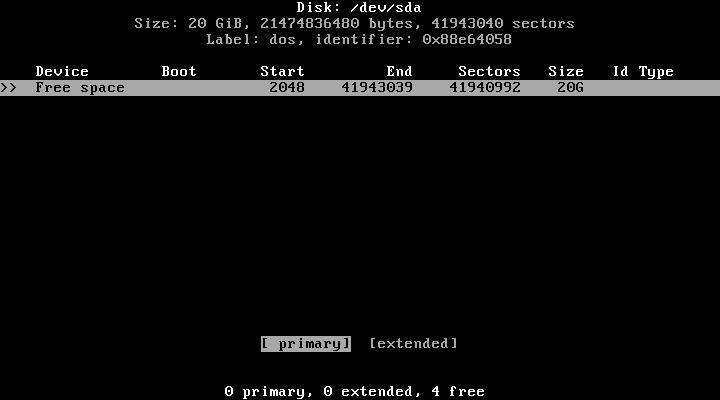
1. Check your Existing Hard Drives
- You have to open the command prompt and type in as fdisk -1, and press Enter.
- Look for the largest hard drive that looks like /dev/sda
2. Create a Swap Partition
- It is important to create a swap partition for the system backup memory. To do so, select New and press the Enter key. Then, select Primary and press Enter.
- You should type the number of megabytes and press the Enter key. i.e., 1024 for one gigabyte. Select End and press the Enter key.
Note: It is important to make the swap partition two or three times of your RAM. For instance, you should make swap partition 8192 or 12288 megabytes for 4GB of RAM.
3. Create a Main Hard Drive Partition
Select Pri/Log Fre Space partition and select New to press Enter. Then, select Primary and press Enter. Check if the size in the MB title is correct and press Enter. Choose the Primary partition again to select the Bootable option and press Enter.
4. Lable Swap Partition
- Choose the swap partition, select Type, and press Enter.
- Type as 82 and press Enter.
- Now, select Write and press Enter.
- Type as yes and press Enter.
5. Note Partition Names
Go to the name column on the left side to find a name sda1 next to the swap partition. Similarly, you will find sda2 besides the primary partition. Make sure you have both the names handy to format the partitions.
6. Select Quit
In order to exit the cfdisk, you shall select Quit and press the Enter key.
7. Format Primary Partition
On the command prompt, type in the following
mkfs.ext4 /dev/[primary partition name ] to press Enter. For instance, mkfs.ext4 /dev/sda2
8. Mount Formatted Partition
Enter as mount /dev/[partition name] /mnt and then press Enter key.
With this, your partition will change into a usable drive.
9. Add Swap File to Swap Partition
Enter the following on the command prompt to further carry out Arch Linux installation.
- mkswap /dev/[partition name] and press Enter.
- Type as swapon /dev/sda1 and press Enter.
Steps to Install Arch Linux
1. Set up a WiFi connection
Type the following commands in order and press enter after each command
- ip link to find the name of the network adapter
- pacman -S iq wpa_supplicant to install the necessary software
- pacman -S dialog to install the WiFi menu
- pcmon -S wpa_action to install software that will connect you to the networks you know automatically
- systemctl enable [email protected] to turn on auto connection service
- wifi-menu interfacename to use the wireless menu for your adapter.
2. Install Base System
Type as pacstrap /mnt base base-devel to press Enter key. You need to wait for about 15 to 30 minutes during this system installation.
3. Open chroot Access
Type as arch-chroot /mnt and press Enter. With this, you can change the aspects of the root directory, including passwords.
4. Set a Password
To use the password to log into the root account, you need to type the following.
- Type as passwd and press Enter
- Enter the password and press Enter
- Confirm password to press Enter
5. Set a Language
- Type as nano /ec/locale.gen and press Enter
- Scroll to choose your language
- You may select the letter available in front of the # symbol next to the language. Press Del.
- Delete # symbol from any other version of the language.
- Press Ctrl+O and press Enter.
- To exit, press Ctrl+X.
- Type as locale-gen and press Enter.
6. Select a Time Zone
- Type as cd use/share/zoneinfor to press Enter.
- Now, type as ls and press Enter.
- Check for country or region and type in as cd usr/share/zoneinfo/country and press Enter. For instance cd usr/share/zoneinfo/Australia.
- Type as ls and press Enter.
- Choose your preferred time zone by typing as ln -s/usr/share/zoneinfo/country/timezone /etc/localtime and press Enter.
7. Set Host Name for PC
Type as echo name > /etc/hostname and press Enter. For example, echo tech0wns > /etc/hostname
8. Download GRUB Bootloader
Type as pacman -S grub-bios and press Enter to install Arch Linux. You should type y and press Enter
9. Install GRUB
To install, type as grub-install /dev/drive name and press Enter.
10. Create an init file
Type as mkinitcpio -p linux and press Enter to store your device hardware info to utilize by Linux.
11. Create Configuration for GRUB
You should type as grub-mkconfig -0/boot/grup/grub.cfg and press Enter.
Related Guide – Steps to install Linux on Chromebook
12. Create fstab File
Type as genfstab /mnt >> /mnt/etc/fstab and press Enter. It will let you identify the file system of the partition.
13. Reboot Computer & Login to Account
- To reboot, type as unmount /mnt and press Enter. Then type reboot and hit the Enter key.
- To login to your account, type as root in the login field and press Enter. Now, provide your password and press Enter.
To Conclude
That’s was all about downloading and installing Arch Linux on your laptop computer. Although installing Arch Linux isn’t simple, you would have found it easy with the step-by-step guidelines given above.
Have you found this section useful and informative? We shall hear it out as comments. For more helpful articles, follow our Twitter or Facebook pages.