Surface Pro is a tablet that runs on the Microsoft operating system. It is an incredibly convenient device to use with comfort and enough functions. It has the ability to run Windows apps and programs. Surface Pro supports two types of keyboards, Touch Cover and Type Cover, where both are easy to type and use. Apart from these, you may incur certain difficulties while taking a screenshot on the Surface tablets. As the Surface Pro is installed with Windows 10, you can take a screenshot in many ways. You can edit, add effects and share the screenshot with others. The following are the hassle-free ways to capture the Surface Pro screen in real-time.
Contents
- Different Ways to take Screenshots on Surface Pro
- Method 1: Take a Screenshot using Surface Pro Buttons
- Method 2: Take a Screenshot with Keyboard
- Method 3: Take a Screenshot using Windows Snipping Tool
- Method 4: Take Screenshot on Surface Pro using Snip & Sketch tool
- Method 5: Take Screenshot on Surface Pro with Surface Pen
- To conclude
Different Ways to take Screenshots on Surface Pro
There are five different ways to take capture the entire or a specific portion of the screen and save them to your device folder.
- Capture the screen using Surface Pro buttons
- Capture the screen using Keyboard shortcuts
- Take a screenshot using Windows Snipping Tool
- Screenshot on Surface pro using Snip & Sketch Tool
- Screenshot on Surface Pro using Surface pen
Method 1: Take a Screenshot using Surface Pro Buttons
#1: Press and hold the Power / Windows logo button and the Volume Down button.

#2: Instantly it takes the screenshot of your active screen and saves the screenshot to the device folder as an image.
Method 2: Take a Screenshot with Keyboard
Your surface type cover has PrtScn key function and you can take screenshot using this key.
#1: Press the Windows key and Prtsc simultaneously.
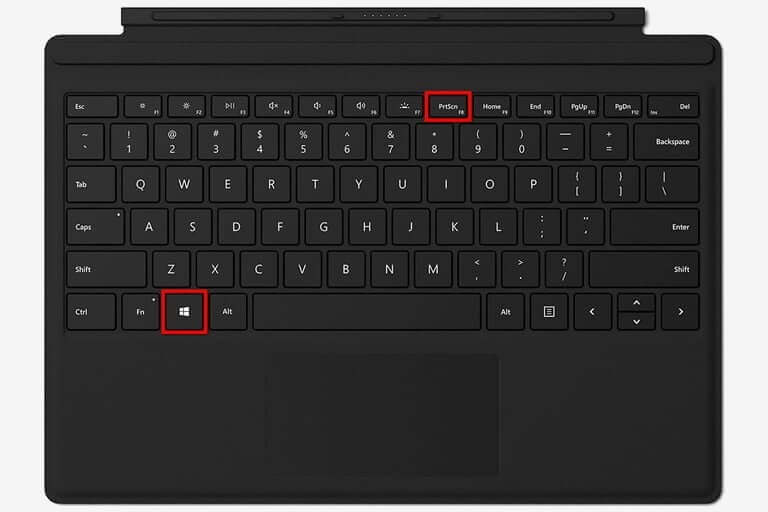
#2: It captures the entire screen and saves the image to the screenshot folder of your device.
Capture the active screen and save to Windows Clipboard
#1: Press and hold the Alt key and then press the Prtsn key to capture the active Window.
#2: Now you can paste the screenshot to the desired software program such as Word or Paint.
Note: Other than the above 2 options, you just press the Prtsc key and your screenshot will be stored in the OneDrive screenshot folder.
Method 3: Take a Screenshot using Windows Snipping Tool
Snipping tool on Windows is a built-in screenshot feature that lets you capture the entire window or a part of the screen. Captured screenshot is stored in the image format PNG, JPEG, JPG or HTML.
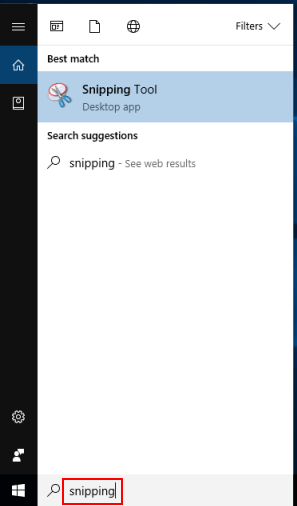
#1: Click the start button on the Windows 10 and navigate to the search box.
#2: Search for the Snipping tool and select the Snipping tool option from the search result.
#3: Open the Snipping tool and click New option.
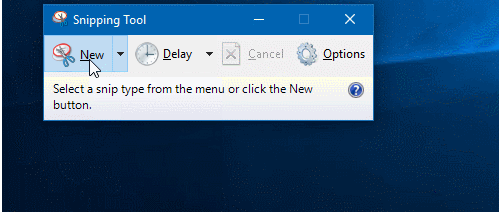
#4: Now click and drag the crosshair to select the area of the screen you want to capture.
#5: After selecting the screenshot area, click the save button to save the screenshot to your device folder.
Alternatively click Copy to copy your screenshot to the Clipboard.
Method 4: Take Screenshot on Surface Pro using Snip & Sketch tool
The latest version of Windows 10 is updated with a new feature called Snip & Sketch tool to take screenshots and save or share it on real-time.
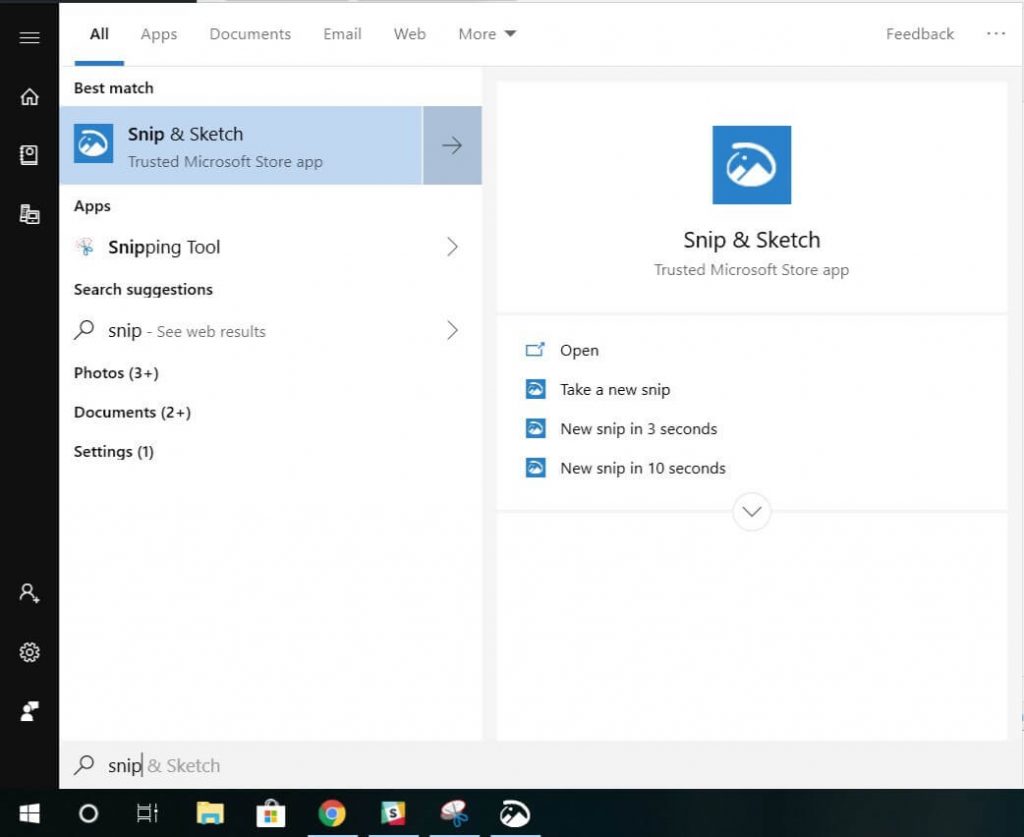
#1: Click the start button and type Snip & Sketch in the search box.
#2: Select Snip & Sketch option from the search result.
#3: Now select New option and then click Snip now button.
#4: Instantly your screen will turn to a dim colour, now click and drag your mouse cursor to select the area of the screen to capture.
#5: The screenshot will appear on the new Snip & Sketch screen, here you can edit the screenshot in any way you like.
#6: After that click save icon to save the captured screenshot to your device folder. Otherwise click copy icon to copy the screenshot to Clipboard.
Note: Keyboard shortcut to launch Snip & Sketch is Windows Key + Shift Key + S key.
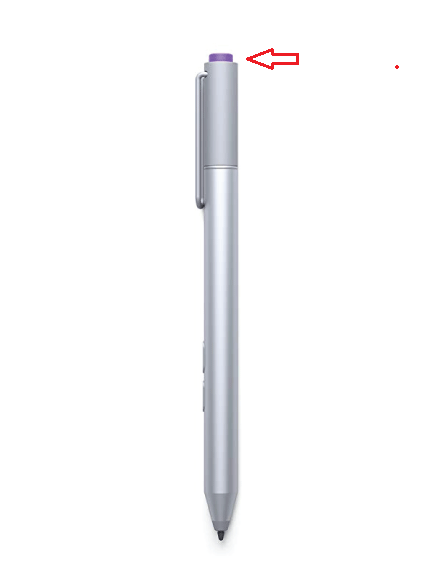
Method 5: Take Screenshot on Surface Pro with Surface Pen
The Surface Pen is a stylus to do various operations on the Surface series devices.
#1: Double click on the top button (Eraser Button) on top of the Surface Pen. It will capture the whole screen and the screenshot will be saved to Dropbox folder.
#2: Instead of saving the screenshot, you can perform editing and click save to save the screenshot.
To conclude
These are the user-oriented methods to capture the Surface Pro screen in real-time. You can choose the most suitable and time-saving procedure to take a screenshot on Surface Pro. These methods can be used on any model or version like the Surface Pro 2, Surface Pro 6, etc. Comment below which methods seems easy for you. Also, do follow our Facebook and Twitter accounts for more related tech updates.