Lenovo is a leading computer manufacturer who strongly competes with brands like Dell, HP, Sony, and many more. The company develops, manufactures, and sells PCs, laptops, tablets, smartphones, and a few more electronic devices. Due to different keyboard orientation, some of the users are finding difficult to take screenshots in Lenovo devices that runs on Windows. If you’re one among the users who don’t know how to take a screenshot on Lenovo laptops, desktops, notebooks, and tablets, here is the guide to help you.
Contents
How to Take Screenshot on Lenovo Laptops/Desktops?
We have divided this method into three different sections, which lets you capture different areas of the screen.
- Take a screenshot of the whole screen
- Take a screenshot of an active window
- Take a screenshot of a particular area
Taking Screenshot of the Whole Screen
Using PrtSc key:
- Press the PrtSc key on your keyboard.
- The screenshot will be saved to your clipboard.
- Now, open any image processing app like Paint and press CTRL + V keys to paste the image.
- Edit the image according to your need and press CTRL + S to save the image.
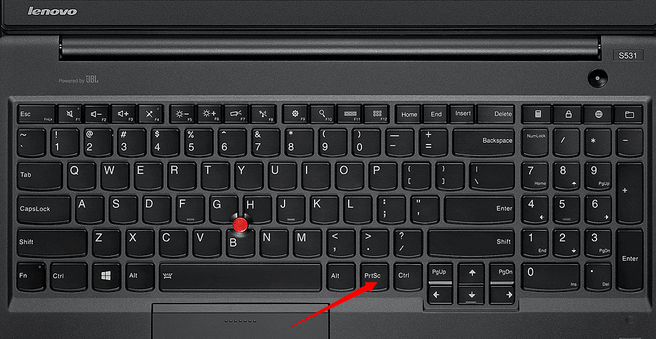
Using Windows + PrtSc keys:
- Press the Windows logo and PrtSc keys simultaneously to capture the entire screen.
- Open the paint or any image processing app and press CTRL + V keys to paste the picture.
- Finally, save the image to the device.
Taking Screenshot of Active Window
Step 1: Navigate to the Window that you want to capture and press the Alt + PrtSc keys.
Step 2: The active window will be captured and saved to the clipboard.
Step 3: Open paint and paste the image.
Step 4: Edit the screenshot (optional) and save to your device.
Taking Screenshot of Particular Area
You can capture certain area of screen in two different ways:
Using Snip & Sketch (only on Windows 10):
- Simultaneously, press Windows logo + Shift + S keys.
- A small editing tool will appear on the top of the screen.
- Select a certain area on your screen with the help of the mouse and release it.
- Once you released the mouse, the screenshot will be stored on your device. Click the notification that appears on the bottom right corner of the screen.
- Edit the image and click the Save icon to store the image on your device.

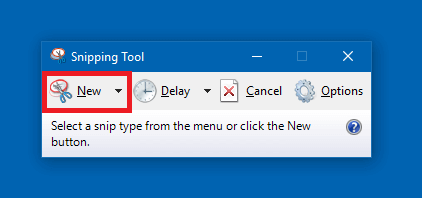
Using Snipping Tool:
- Press the Windows key on your Laptop or desktop and type Snip.
- Launch the Snipping Tool app.
- Tap the New menu.
- Use the mouse to drag and capture the screen that you need.
- Once you release the mouse, the image will open on the Snipping tool.
- Click CTRL + S to save the image.
How to Take Screenshot on Lenovo Mobiles?
Since Lenovo mobiles and tablets run on Android OS, you can follow the same procedure that you used to take a screenshot on Android devices. Simply press the power button and volume down to take a screenshot on Lenovo mobiles.
To Conclude
Knowing how to take a screenshot on Lenovo is very essential to capture and save the important information displayed on your screen. According to Windows, the Snipping tool method mentioned in this guide will soon be moved to the new Snip & Sketch feature.
What do you think about the article? Share your feedback in the comments section. If found this really helpful, share it on your Facebook and Twitter profiles.