In recent times, we have been well aware of this Do Not Disturb (DND) mode. As we are working from home, this mode is a savior for us. In case if you are using Mac PC for work, you can enable the Do Not Disturb mode. So that you don’t get distracted by calls, text messages, and notifications from other applications.
There are two ways to activate DND mode on Mac. You can enable and disable it manually or you can schedule it. Most of us will prefer scheduling so that it will turn on during our work time and will automatically turn off. Students are also using this nowadays for their online classes. Before getting into the steps, make sure to update your Mac to its latest version.
Contents
How to Turn on Do Not Disturb on Mac: Easiest Way
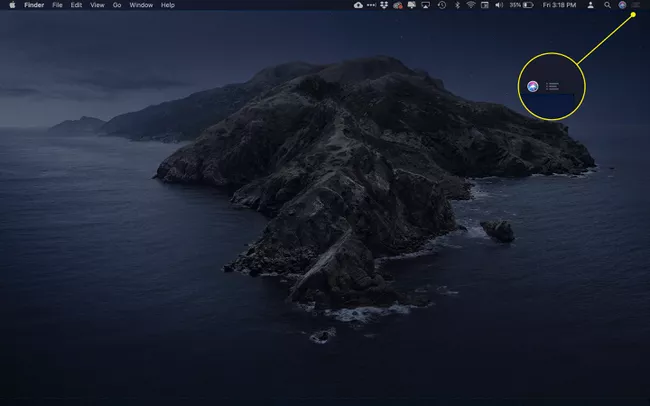
(1) From the menu bar, click the Notification Center icon.
(2) Tap and hold the Option Key and select the Notification Center icon.
(3) This will turn on the Do Not Disturb mode on your Mac. It will be indicated by the Notification Centre icon (The icon will turn to grey color).
(4) Similarly, to turn off do not disturb mode, press and hold the Option key and select the Notification Center icon again.
FYI: DND on Mac will be turned off automatically on the next day if it is not turned off manually.
How to Turn On DND on Mac from Control Centre
(1) Click the Control Centre icon.
(2) Tap the Do Not Disturb icon.
(3) You will get different options to activate DND.
(4) Choose your preferred option from For 1 Hour, Until Tomorrow, and Always On.
(5) For the first two options, the DND will be turned off automatically.
(6) For Always On, you have to turn it off manually.
(7) The DND mode indication will appear on the Do Not Disturb icon.
How to Turn on Do Not Disturb on Mac from Notification Centre
(1) Click the Notification Center icon.
(2) From the notification center, scroll up to reveal two options. Night Shift and Do Not Disturb.
(3) Alternatively, you can swipe down two fingers in the trackpad to get Night Shift and Do Not Disturb.
(4) Toggle the Do Not Disturb switch to On position.
(5) Similarly, to deactivate, toggle the Do Not Disturb to Off position.
How to Automatically Schedule Do Not Disturb
You can also activate and deactivate do not disturb mode on a daily basis. You can also customize it in case if you want to be notified during calls.
(1) Click the Apple icon and choose System Preferences. Then, choose Notifications. You can also click the Settings icon in the Notification Tray to go to the Notification menu.
(2) Choose the Do Not Disturb option.
(3) Select the check box next to the time box. Enter your preferred time (use up and down arrows to change the time).
(4) Here, you can also change the DND settings. Tick in the needed options and close the window.
(5) The DND mode on your Mac will be activated based on the chosen settings.
How to Create Shortcut for Do Not Disturb
(1) In the System Preferences.
(2) Click the Keyboard option.
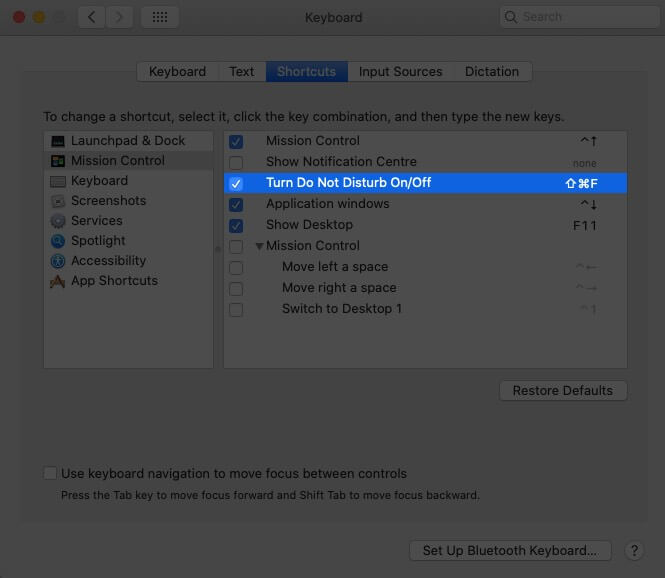
(3) Then, click the Shortcuts icon.
(4) Select the Mission Control option in the left box. Tick in the Turn Do Not Disturb On/Off.
(5) Double click on None or the keyboard combination that appears.
(6) Now, select your desired keyboard combination to set a shortcut.
(7) You are allowed to choose any number or alphabets along with FN or Command or Option.
This is all you need to know about the DND mode on Mac. Similar to Windows 11’s Focus Assist, the Do Not Disturb mode on Mac will help you to stay focussed on your work and keep you from distractions. The methods mentioned above will be applicable to all Mac PCs like MacBook Air, MacBook Pro, iMac, and more. If you have any issues with your Mac PC, let us know in the comments.
Follow our Facebook and Twitter pages to get more updates.