Mac computers are the most sophisticated devices. There are a lot of hidden features in the Mac systems. At some point in time, we may need to record our Mac screen. Situations like when you are making a tutorial video, or you want to describe something over the Mac screen. Unlike screen recording on Windows computers, the Screen Record option on Mac is easier. In Mac, you can even customize the screen that you are going to record.
Contents
Ways to Screen Record on Mac
There are two ways to do the screen recording on Mac.
- Using Keyboard Shortcut Keys
- Using QuickTime Player
Before getting into the steps, update the macOS to the latest one.
How to Record Mac Screen using Keyboard Shortcut Keys?
This method is applicable to macOS Mojave and above. If you are using the lower version, skip to the next method.
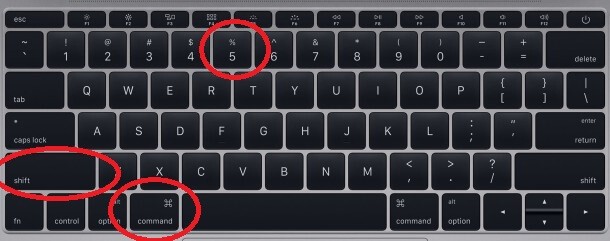
(1) On your Mac keyboard, press Shift + Command + 5.
(2) Now, you will see a toolbar on the bottom of the screen.
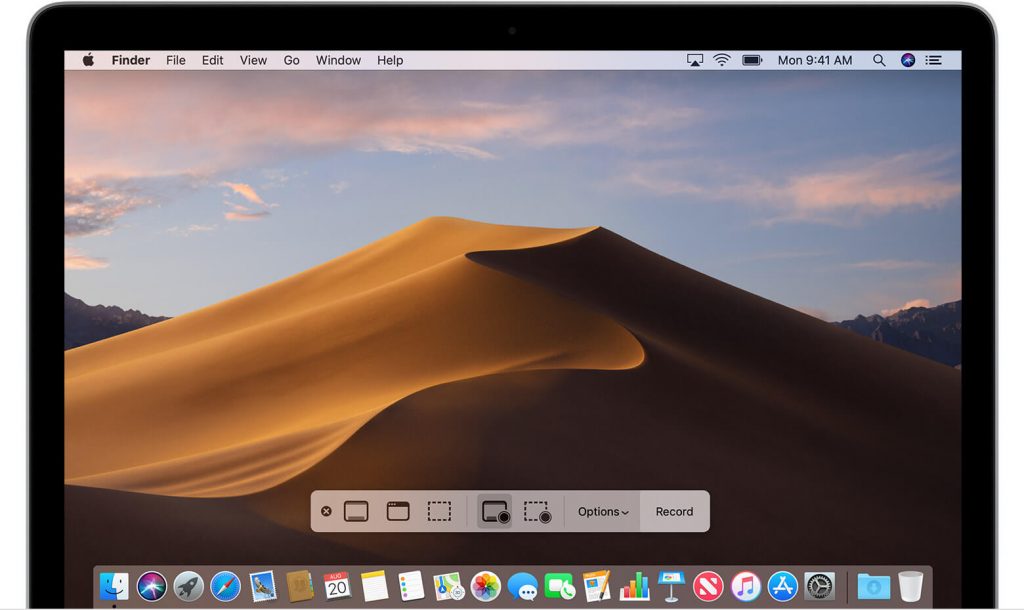
(3) Click the fourth icon to get the screen recording feature. Then, click on the tab or screen that you want to record and select the Record button on the on-screen controls.

(4) When your recording is done, it will appear on the bottom right side of the screen. Click on it for quick-edit features.
(5) In the quick-edit screen, you can trim, save, and share the video.
(6) If you want to record a specific portion of your screen, click the fifth icon on the toolbar.

(7) Drag the pointer to the area that you want to record and click the Record button.
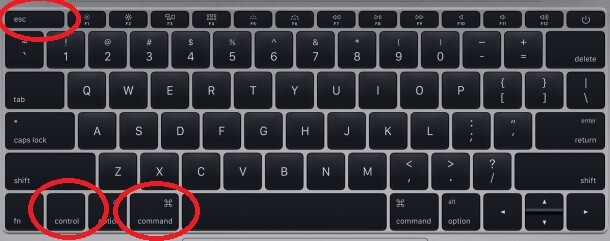
(8) To finish the recording, click the Stop button in the menu bar or press Command + Control + Esc.
How to Screen Record on Mac using QuickTime Player
QuickTime Player is a pre-installed application on the Mac computers. It is a media player app. It can be used for screen recording too.
(1) Launch the QuickTime Player app on your Mac.
(2) Go to File –> New Screen. The Screen Recording window will open.
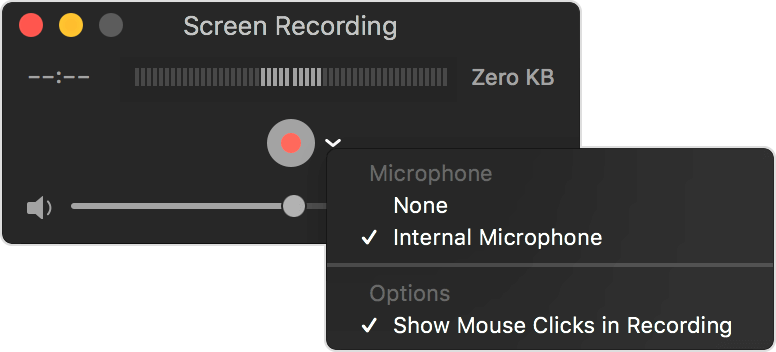
(3) Click the Drop-down arrow to specify the settings. Choosing the Internal Microphone will record audio from your microphone. Choosing Show Mouse Clicks in Recording will highlight the mouse pointer.
(4) When you are done with it, click the Record button.
(5) Click anywhere on the screen to record the whole screen or drag an area for specified screen recording.
(6) When the recording is done, click the Stop button in the menu bar or press Command + Control + Esc.
(7) When you finish the recording, the application will open the recording automatically and allow you to edit. Modify the recording and save it.
You can also use screen recorders to record your screen as well. There are plenty of tools available and most of it works similar to screen recorder on Linux and Windows.
Notes
- When you save the recording, it will be saved under the name Screen Recording date at time.mov (Screen Recording 2020-04-05 at 06.30.45 PM.mov)
- If you want to exit from the Recording Window, click Esc on the keyboard.
This is how you can screen record on your Mac systems. You can use any of the above methods to record screen on your Macbooks and Mac PC. If you have any other doubts about the Mac systems and its features, tell us in the comments section.
Follow our Facebook and Twitter pages to get more updates.