With intuitive UI and flexibility, Windows 11 is all set to be launched on October 5th, 2021. It is going to be one of the biggest revolutions in Windows history as it will be the first pack that comes without Internet Explorer since Windows 95. Windows 11 is accessible via the taskbar that focuses on security, accessibility, addressing various deficiencies in Windows 11. The Microsoft Store will be redefined and the UI comes with live titles. Also, an update of Windows 11 is expected in 2022 which will allow its users to install the Android apps on Windows 11. Now let’s see how to stop automatic updates on Windows 11.
Updates are essential to fix security vulnerabilities, address issues, and improve the overall experience. However, letting Windows 11 or earlier Windows version computer update automatically may cause few problems due to buggy release. The update may also cause the existing application to not run smoothly. So it is advisable to update the Windows computer manually.
Contents
How to Stop Automatic Updates on Windows 11
There are five different ways to stop Windows 11 from updating itself:
- Pause auto-updates
- Set up metered connection
- Disable Windows 11 update service
- Stop automatic updates on Windows 11 using registry editor
- Stop automatic updates on Windows 11 using group policy
Method 1: Pause Auto-Updates
By pausing auto-updates, nothing will update on your device with Windows 11 for 7 days. But after 7 days, Windows will check for updates automatically.
1. Press the Windows + I buttons on the keyboard to open the Settings app. Select the Updates & security tile.
2. Click on the Windows Update option from the left sidebar.
3. Select the button labeled as Pause for 1 week.
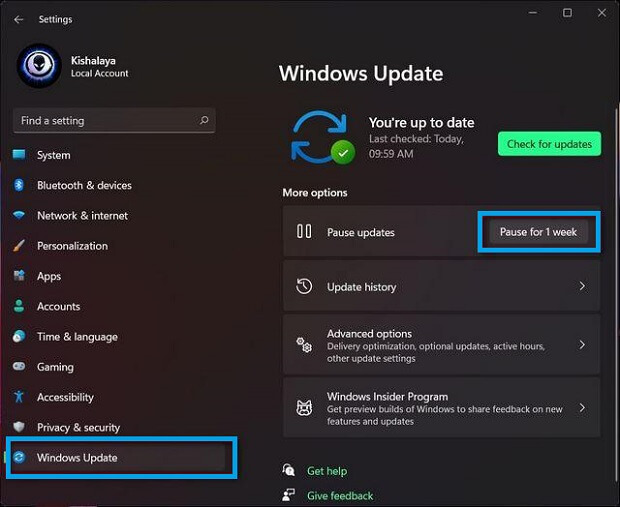
Now the computer will not update anything for the next seven days. If you want, you can manually update anything you want.
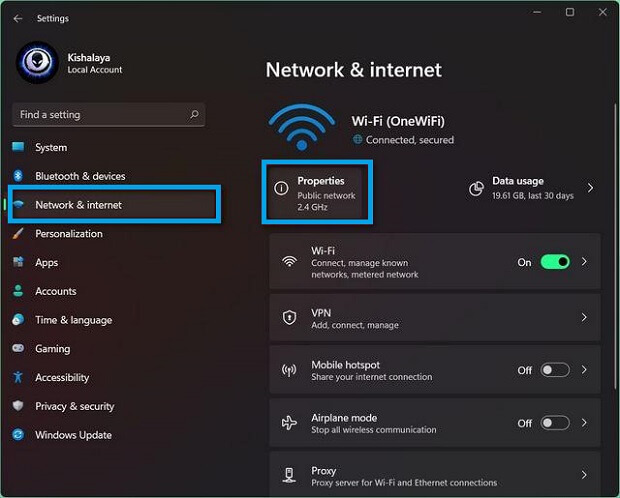
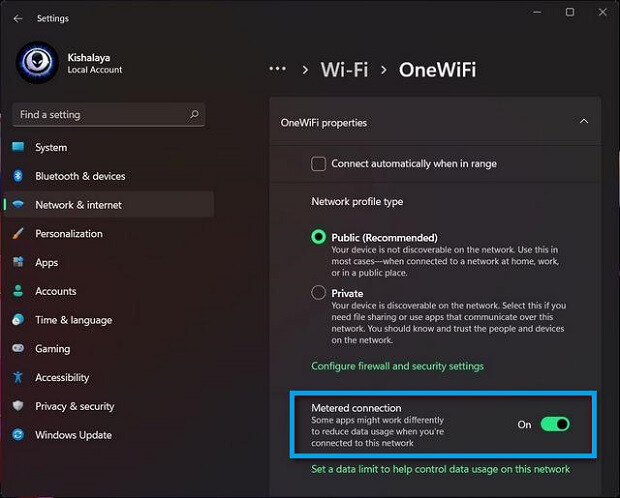
Method 2: Set up Metered Connection
You can disable automatic updates by designating your Wi-Fi or ethernet connection as Metered one. With Metered connection settings, Windows 11 will restrict all updates.
1. Open the Settings from the Start menu.
2. Tap the Network and Internet tile.
3. Now click on the Connection Properties option.
4. Turn on the Metered Connection setting.
5. Now, go to Settings >> Windows Update >> Advanced Options.
6. Then make sure to Download over Metered Connections is turned off.
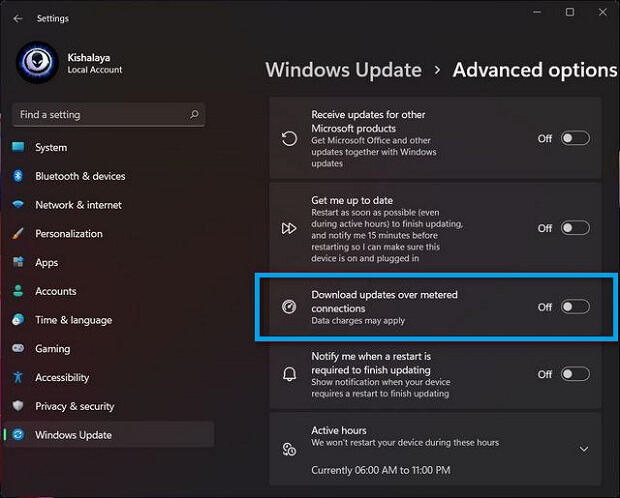
Set all the connections as metered so the device will turn off automatic updates.
Method 3: Disable Windows 11 Update Service
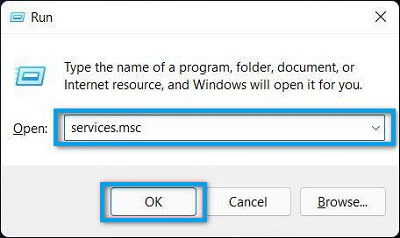
1. Press the Windows + R key on the keyboard. It will open the Run dialogue box.
2. Type services.msc and then hit the Enter button.
3. Now, scroll down and double-click on the Windows Update.
4. Under the General section, tap the drop-down icon located next to Startup type.
5. Select the Disabled option.
6. Click Apply and then OK to close the tab.
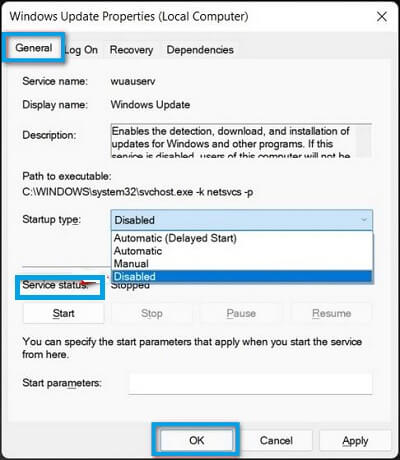
If you want to enable Automatic Updates, choose Automatic from the Startup Type drop-down.
Method 4: Stop Automatic Updates on Windows 11 Using Registry Editor
This method may bring issues to your Windows installation. But before that one should be able to enable and create a System Restore Point. To permanently stop automatic updates on Windows 11, you can go for the following steps.
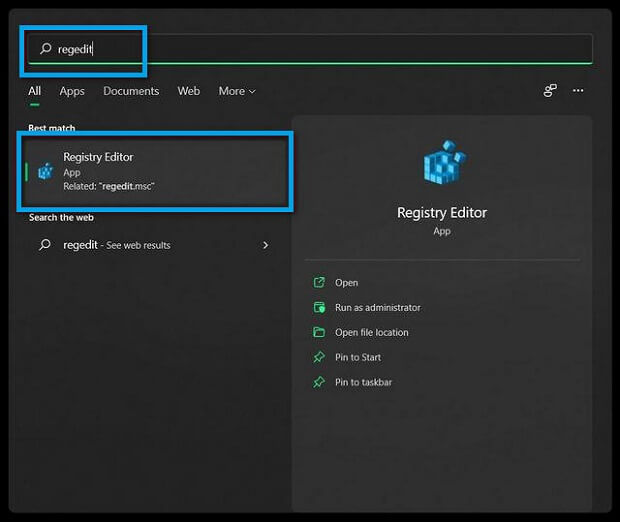
1. Go to Start and search for Registry Editor.
2. Open the Registry Editor on your computer.
3. Navigate to the following location:
HKEY_LOCAL_MACHINE >> SOFTWARE >> Policies >> Microsoft >> Windows >> WindowsUpdate.
4. Under the AU-Key, create a D-WORD a 32-bit value and name the entry as NoAutoUpdate.

8. Double-click on the newly created file and change the value from 0 to 1.
9. Click OK to save the changes. Now, restart your PC and the automatic update will be turned off.
Method 5: Stop Automatic Updates on Windows 11 using Group Policy
1. First, enable group policy editor on Windows 11.
2. Press the Windows + R key. Type gpedit.msc on the open field.
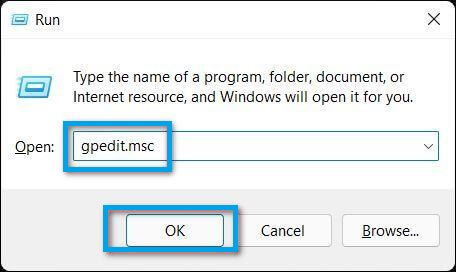
3. Press enter to open the Group Policy editor.
4. Go to the location, Computer Configuration > Administrative Templates > Windows Components > Windows Update > Manage end-user experience.
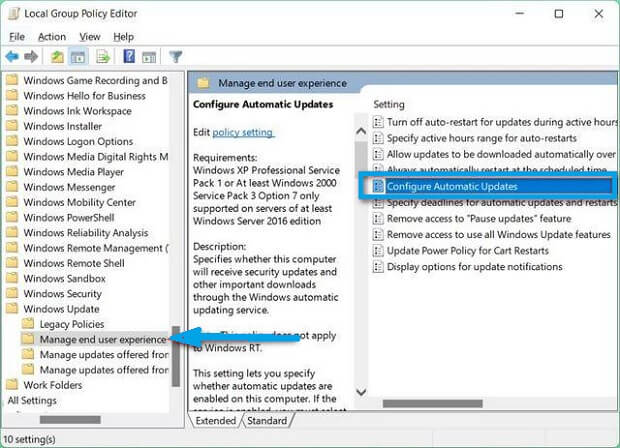
5. Double-click on the Configure Windows Update from the left sidebar.
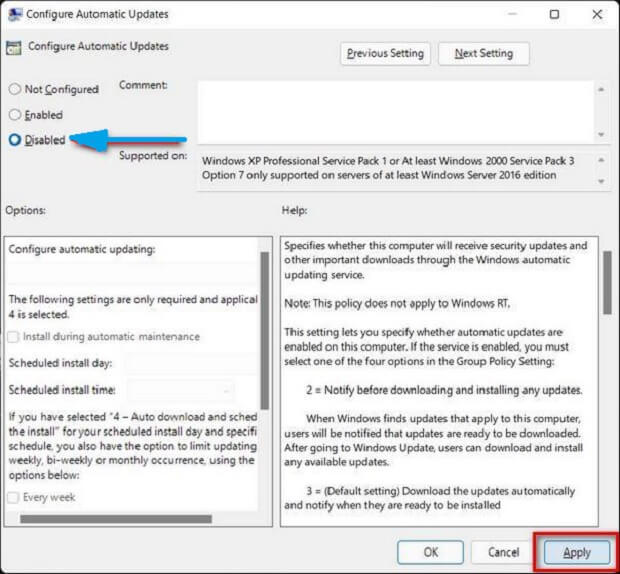
6. On the Automatic Updates screen, select the Disabled option. Click Apply and then OK to save the changes.
Now you can update Windows 11 manually whenever you want.
And that is how you can stop the automatic updates on Windows 11 PCs. If you have any other options, do let us know in the comments section below. Get all updates from us by following our Techowns’ Facebook and Twitter pages.