iPad is one of the most secured tablets available in the market. It runs on iOS and works similar to an iPhone. Earlier, iPad supported only WiFi connectivity but now iPad supports SIM cards as well. You can use the iPad to perform all sort of operations you perform on an iPhone. It allows you to make calls, take photos, play games, stream movies, and much more activities as well. By taking more photos, your storage might get full. During such times, you can either sync your photos to iCloud or transfer photos from iPad to computer to free up storage.
Contents
Transfer Photos from iPad to Computer
There are various methods to transfer iPad photos to your computer or PC. Here are the most common methods of doing it.
Method 1: Transfer Photos from iPad to Computer using iCloud
Note: This method works with both Windows and Mac devices. Mac has iCloud preinstalled and it syncs photos automatically. In Windows, you can install iCloud and sync it.
(1) Open the Microsoft Store on your Windows computer.
(2) Search for iCloud app.
(3) Select the app and click Get button from the app information screen.
(4) Once the download is completed, click on the Launch button to open the iCloud app on your Windows computer.
(5) Now enter your Apple ID credentials to sign in to iCloud app.
(6) Next click the check box to the right of iCloud Photos.
(7) Click Download new Photos from PC checkbox to display all Photos from your iPad on your PC.
(8) Next click Done and then click on the Apply option to download all your iCloud photos to your Computer.
Note: Before transferring photos, ensure that all your desired photos on iPad is synced with iCloud app.
Method 2: Transfer Photos from iPad to Computer using USB Cable
While connecting iPad and computer through USB cable, your computer will recognize your iPad only when an iTunes app is installed on your computer.
(1) Open the Microsoft app store and search for iTunes app.
(2) Click on the Get button to start installation process.
(3) After that click on the Launch button to open the iTunes software on your Windows.
(4) Login to iTunes with your Apple ID and password.
(5) Now connect you iPad and Windows computer with the USB cable.
(6) Unlock your iPad. Otherwise, your computer doesn’t shows your iPad.
(7) Now a small AutoPlay window will appear.
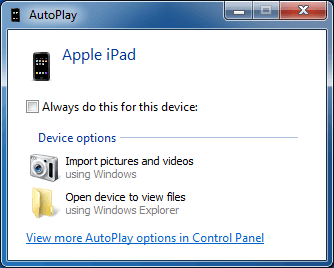
(8) Here click Import Pictures and videos option to instantly start transferring photos and videos to your computer from the iPad.
Method 3: Transfer iPad Photos to PC via File Explorer
If you decide to transfer photos from iPad to Computer using File Manager app, then you need to install and run the iTunes app on your Windows computer.
(1) To begin, connect your iPad and computer with the USB cable.
(2) Now turn on your iPad and unlock it.
(3) After that tap on “Trust” option in the Pop up that appear on your iPad.
(4) Now open the Windows Explorer app (Windows Key + E) on your computer.
(5) Here select This PC option and select your iPad from the sub menu.
(6) Then open the internal Storage option, it will display all your iPad folder.
(7) Now open the DCIM folder.
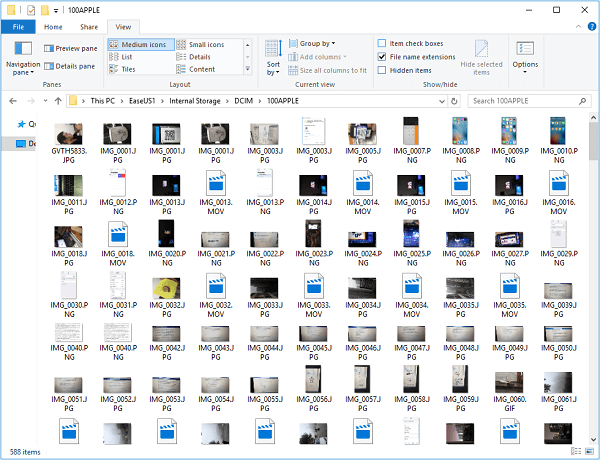
(8) Select and copy particular or any number of images and videos that you desired to transfer to your PC.
(9) Now choose the computer folder and Paste (Ctrl + V) the copied images from your iPad storage.
Note: You can also use this method to transfer photos from Android to PC as well.
Method 4: Transfer iPad Photos onto PC via Windows Photos app
(1) Connect your iPad and computer with the suitable USB cable.
(2) Click on the Windows start button and select the Photos app.
(3) Open the Photos app and click on the Import option at the top right corner of the app screen.
(4) Under Import select From a USB device option.
(5) All your new photos are selected by default. If you don’t want to transfer the photos to your computer, just uncheck the photos.
(6) Next click Continue to start transferring.
(7) Once the transferring process is completed, all your iPad or iPhone photos are available on your Windows Photos app.
Note: Like transferring files from iPad to computer, you can also transfer files from PC to iPad as well.
Our Opinion
By following the above methods, you can transfer photos from your iPad to your computer. You can use any of the above methods and free up your space on the iPad. Photos on iPad occupy more space than any other media and hence, transferring it will free up spaces on your iPad.
If you have any queries, ask us in the comments section. Follow our Techowns page on Twitter and Facebook for regular articles.