Pinterest works quite differently from other social media apps. If you have so far used it to get great ideas as inspiration, then it has just more than it. Pinterest provides a lot of features for its users. One among them is creating Rich Pins. For those unaware, it is nothing but providing additional info to your Pin. In more technical terms, Rich Pins will show the metadata right on the Pin itself. So, adding a Rich Pin on Pinterest will ensure that the important information is always available on the Pin and you need not look for it anywhere. It helps the Pinners to increase their engagement and provide them richer experience while using the app. If you find this feature interesting, then know how to enable rich pins on Pinterest.

Rich Pins on Pinterest Classifications
Rich Pins are classified into four types. It includes App, Article, Product and Recipe Pins.
Product Pins – Pinners will be able to see info about products or things you sell. For instance, its price, availability, and buying option. Product Pins must be linked to the product landing page where it can be purchased.
Article Pins – It let Pinners know the original content that describes the story. It includes story descriptions, headlines, and the author of the story.
Recipe Pins – It lets the Pinners find the recipe within the Pin. It will show title, ingredients, cooking time, serving info, ratings, etc.
App Pins – It is only available for iOS platforms. It will let the Pinners to download the app by clicking on the Install button without leaving Pinterest.
How to Enable Rich Pins on Pinterest
Note: Rich Pins will add extra details to the Pins and it updates info from the original website. Any changes in the original websites will be automatically reflected in the Rich Pin.
(1). First of all, add rich meta tags to your article, product, or recipe content.
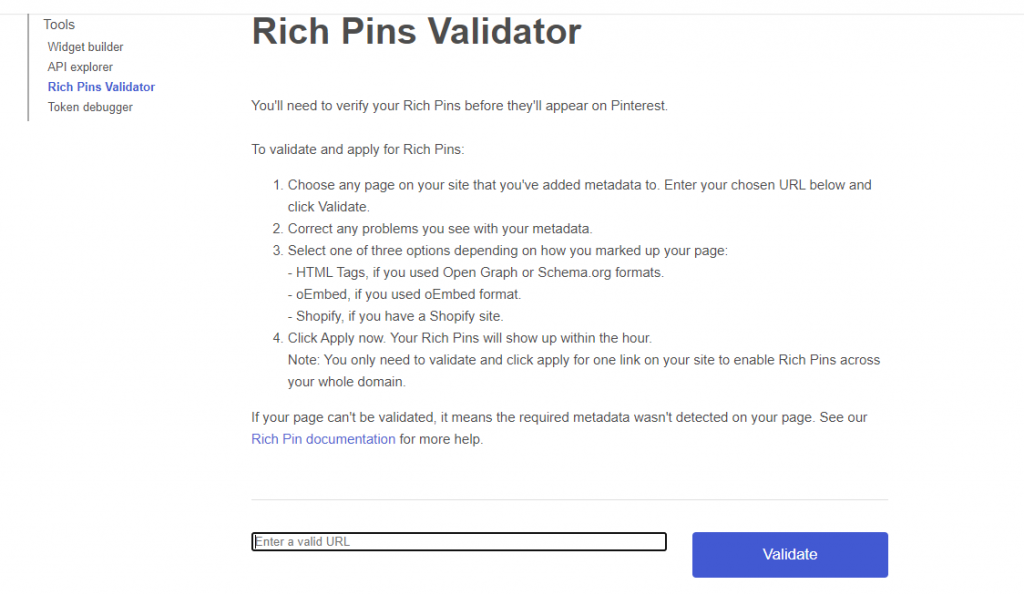
(2). To verify your Rich Pins using the Validator, choose any page on your site that includes the added metadata.
(3). Visit https://developers.pinterest.com/tools/url-debugger/ using the browser.
(4). Provide the chosen URL in the Pinterest Rich Pins validator field and click Validate.

(5). Choose between HTML Tags or oEmbed or Shopify.
(6). Click on Apply now. You will get confirmation of Rich Pins within an hour.
Note: Your application will take maximum of 24 hours to get processed.
Note: To enable Rich Pins on the whole of the domain, you need to validate only one URL. You don’t need to submit all the URLs.
Techowns Tip – How to Change Email on Pinterest
To Conclude
When the Rich Pins is enabled on your site, then all the content that has the correct meta tags on your site will appear as Rich Pins when added to Pinterest. Even the existing pins that link back to pages with rich meta tags will also appear as Rich Pins.
Hope you have learned about creating Rich Pins on Pinterest from this section. Ask us your queries as comments. Follow us on Facebook and Twitter for more useful article updates.


